Begonias are a classic horticulture favorite amongst hobbyists and professionals alike for obvious reasons. Just in case those reasons aren’t as obvious as we’d thought, these plants are just full of surprises: luscious blooms, elegant foliage, and strange growing patterns.
Aside from their allure, begonias are a very easy going plant. They’re fun to grow both indoors and out, and they can be styled with a very wide variety of other types of plants. Some begonias can tolerate moderate cold, so they can be grown outdoors as an annual in cooler regions.
History and Culture of Begonias
These plants originate in tropical regions of Asia, Africa, and Central and South America. They were first documented in the early 1700s, and began making their way round the world slowly but surely.
Since begonias are monoecious, meaning they bear both male and female flowers from one plant, there are lots of man-made and natural hybrids out there waiting to be discovered. It’s for this reason that many begonias look nothing alike, and why collecting them can be so fun and fascinating!
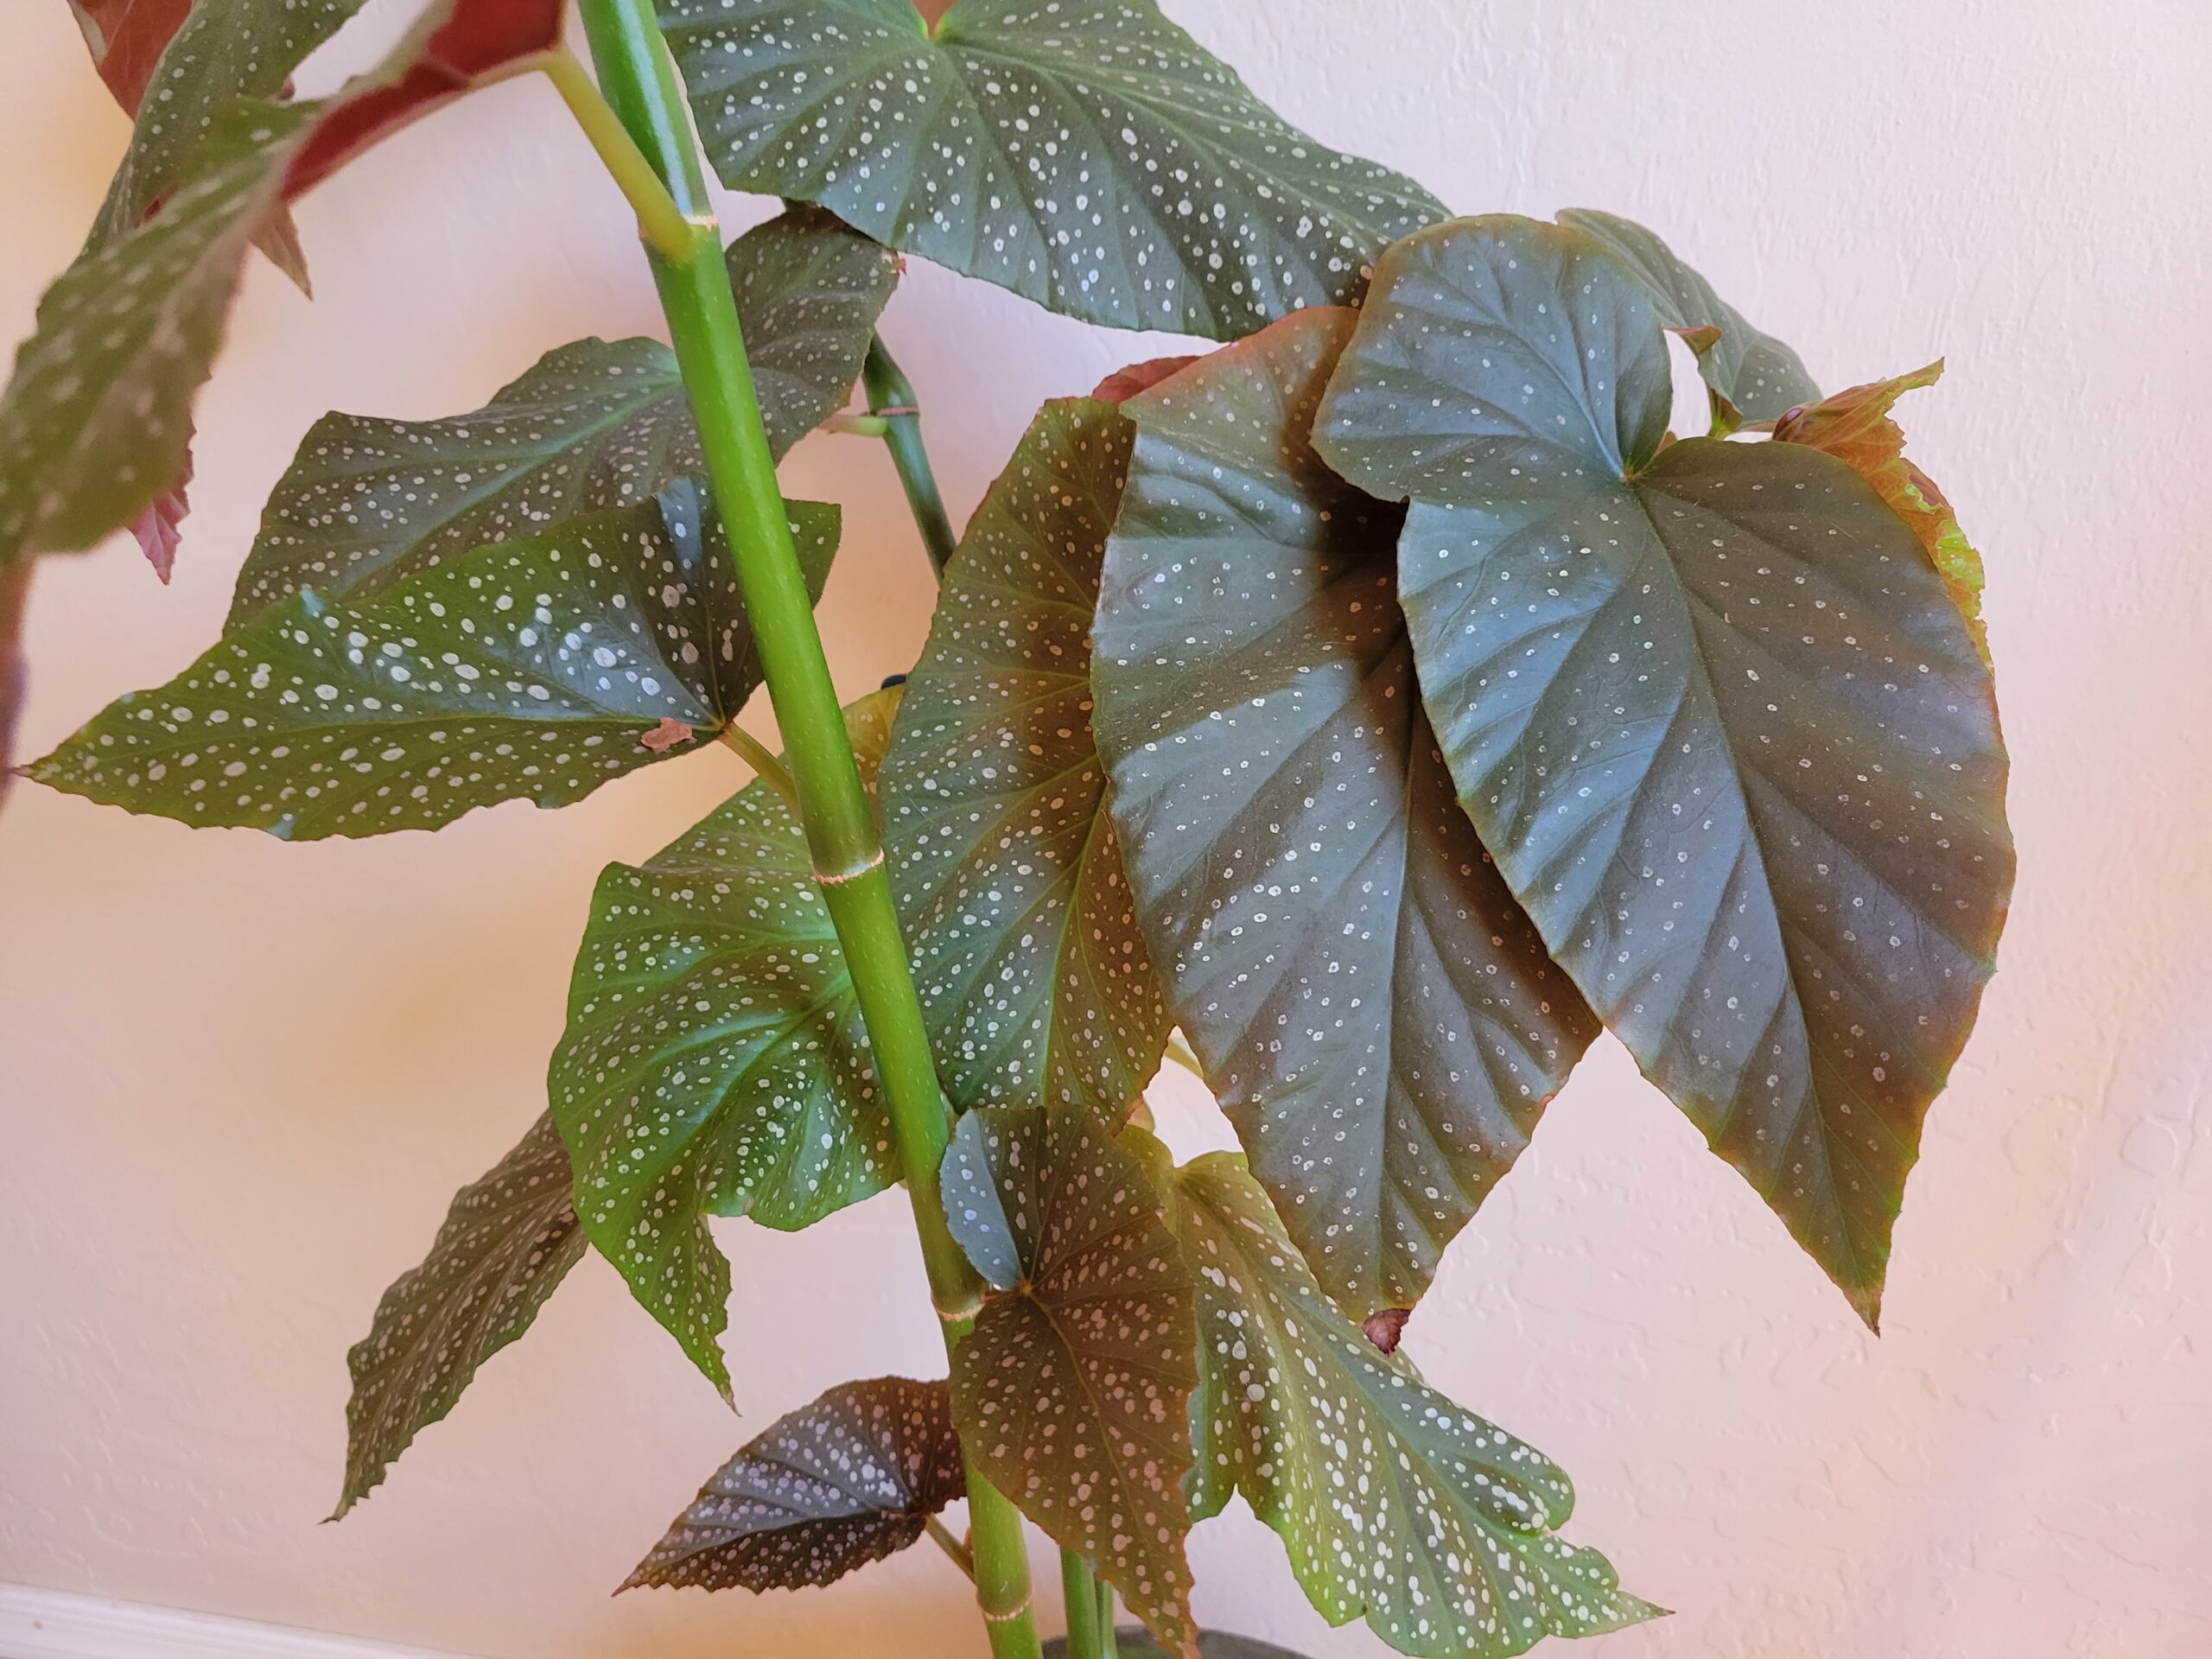
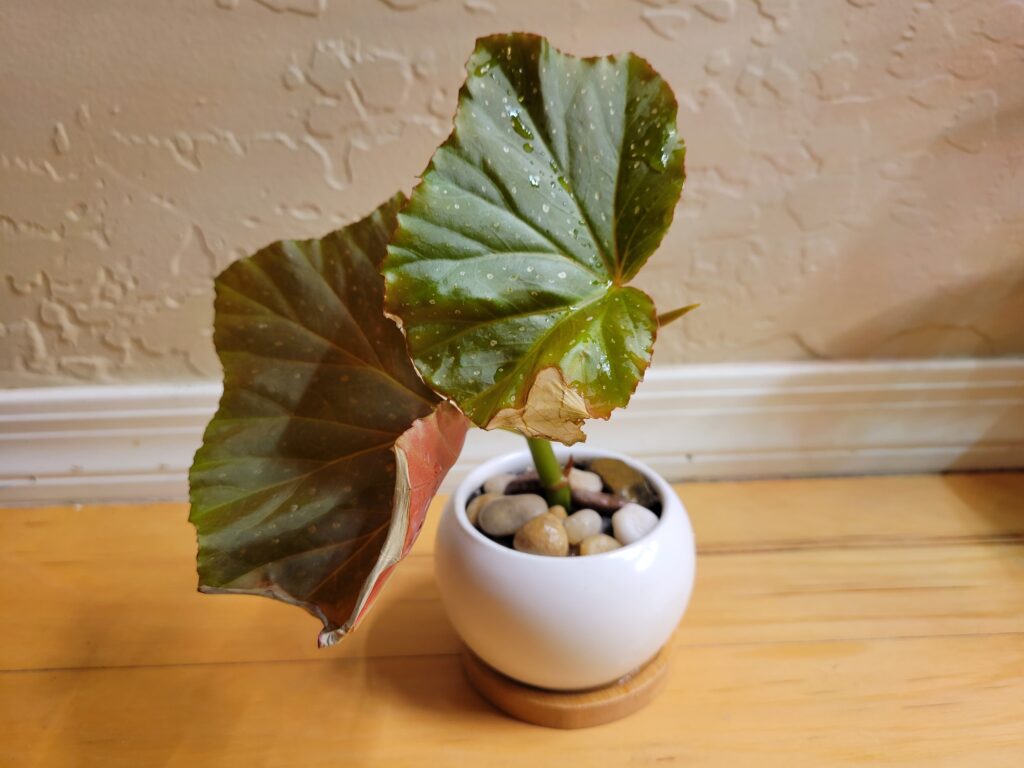
Unlike many plant species out there, begonias also vary widely in their phenotypes. Some begonias are rhizomatous, while others are trailing, and even more are shrub-like. The “Angel wings” begonia, a popular houseplant that just recently made a huge comeback, is also one of the best-selling plants of the decade.
Tools for Propagating Begonias
Every good plant project needs a basic set of tools to be successful. You don’t go around tending to your plants without a watering can, and you shouldn’t start propagating plants without shears. It’s the same principle, but either way, here’s a list of the most important items to have before you start propagating your begonia.
Plant shears
The holy grail of plant propagation is a good pair of sharp, clean shears. The main thing to watch out for is rust or chips on the blades; if they’re too damaged or rusty to cut through a bulb, they’re no good. Using dull shears can actually cause harm to plants by mangling vital tissue.
Instead, you can rely on either a well cared-for pair of shears or a new razor blade. Both of these options will suffice, but if you end up using the latter, wear gloves to ensure that you don’t end up with more scrapes than your begonias!
Rooting hormone
Often available in both powder and liquid form, rooting hormone can greatly increase the chances of success with any type of propagation. This stuff can really come in handy, especially with slow-growing plants.
Essentially, rooting hormone acts as an agent in the plant’s sex cells that are located within its nodes. It sends a signal that it’s time to put some cells to use to make new roots, which in turn helps the plant recuperate faster. It’s propagation paradise in a bottle.
Water vessels
No matter how many cuttings you end up with, you’ll need something to put them in. Most folks use clear vases, glasses or bowls, but you can use anything you have on hand that can easily be cleaned and refilled frequently with fresh, clean water.
Make sure that whichever vessel you choose has enough room at the top to remove the begonia stalks without damaging any roots that may grow. If the stem barely fits when you put a cutting in, chances are it won’t fit on the way back out after rooting. Cutting? Caput. Glass? Broken.
Plant labels
If you’re like us and you have way too many of each kind of plant out there, then you may want to invest in some cheap plastic or bamboo plant tags to help identify the cuttings while they’re still maturing. It’s easier than it looks to mislabel a begonia if you have more than one.
Another great use for these handy little gems is to make a note of the dates the cuttings are taken, when they are repotted, and if they get fertilized. Using this method, you can be sure that you’re not overfeeding or repotting too soon.
Planters & soil
Whether you end up doing soil propagation or just the standard water method, you’ll end up needing these things at some point. Best to have them ready just in case. For planters, go for something with good drainage but enough room for a solid root system to grow. 3”-4” pots are usually sufficient.
Soil should be a coarse mixture including perlite and coco husk. You can opt for tropical formulations intended for most indoor plants, but be sure to read the package to find out when to fertilize, as most of these mixtures already contain fertilizer.
Different Types of Begonia Cuttings
As there are different types of begonias, there are different types of cuttings. Since begonias take on many forms, they need to be propagated in different ways. You wouldn’t take a cutting of a bulb that needs to be divided, nor would you cut a plant without nodes and try to propagate in water.
Thus, we’ll go over the most common forms of begonia propagation to help you identify the different types of begonias and how they should be propagated.
Rhizomatous & tuberous
Some begonias, like those grown outdoors as annuals in colder zones, are known as rhizomatous and tuberous begonias. Both are propagated the same, but they are actually slightly different from one another.
Tuberous begonias are a bulb that has a dormancy period when the weather gets cold for the year. During this time, the foliage above ground dies off, and energy is stored inside the bulb for the winter period. Then, once spring comes around, the plant comes out of dormancy and produces foliage and, eventually, flowers.
These plants both can be divided into many different plants by making cuts in the dormant bulbs and rhizomes. Unpot or unearth the plant just before the last frost, then clean off any dirt or excess roots.
A cut can be determined by looking for growth nodes. These will appear as small, white lumps on the bulbs or rhizomes, similarly to eyes on potatoes. Anywhere that has one of these nodes can be cut into its own plant, but pieces should be no smaller than ¼ inch cubed.
Plant in soil with nodes facing up just after the last frost, and protect with burlap if temperatures get close to freezing for the first season. These begonias aren’t great candidates for water propagation; the bulbs and rhizomes will only rot if submerged too far into the water.
Cane or stalk
This is likely the begonia you’re most familiar with: the golden child of indoor, tropical begonia plants. Angel wings begonia is the most common type of indoor begonia, and for good reason. They’re absolutely amazing, and also super easy to propagate.
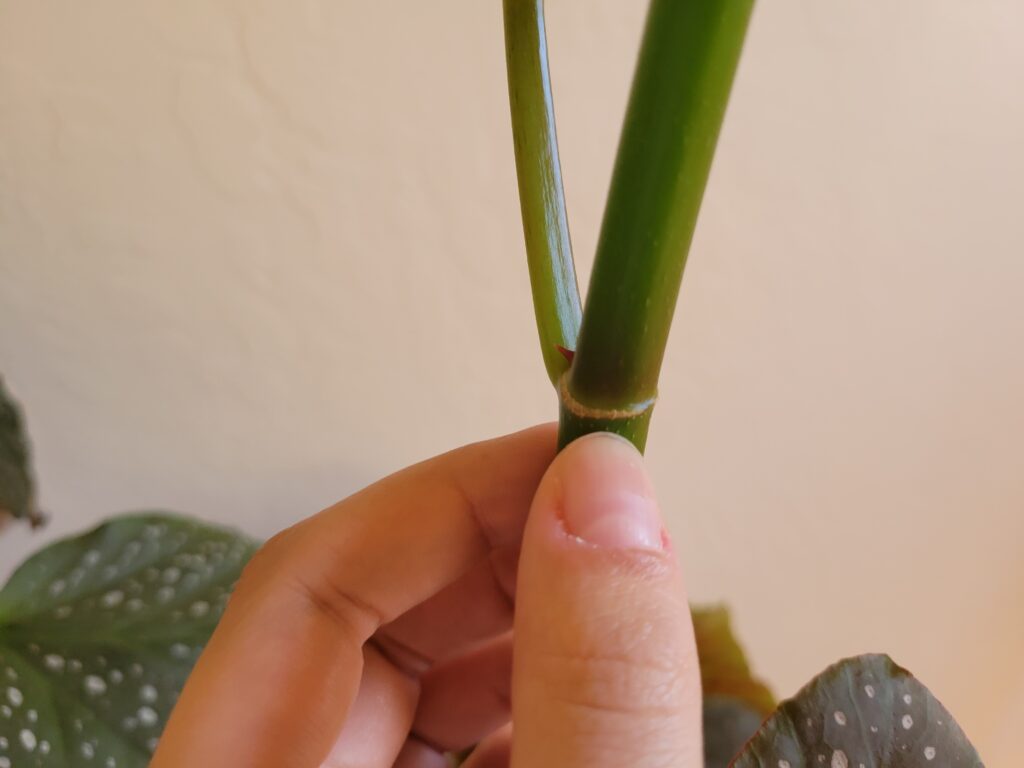
These types of begonias have conveniently placed nodes that allow you to take stem cuttings or use air layering to create more plants. This begonia is also a great candidate for tissue culture, since it contains sex cells that are easy to retreive. If you’re an advanced grower, give it a try!
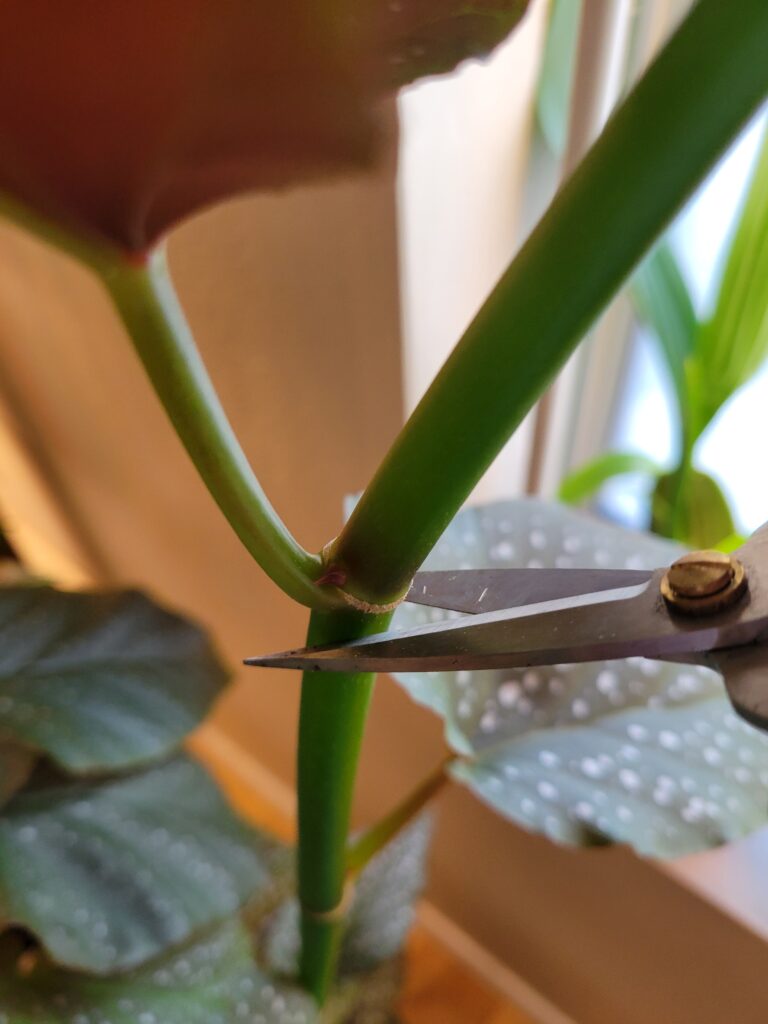
The way to propagate these begonias is super easy as well. You can take cuttings like you normally would on a vining plant; simply make a cut just below the node one growth down from where you’d like to propagate, then trim the remaining leaves to half their size.
From here, you can grow the cuttings using the water method or the soil method, whichever you prefer. Cane begonias are particularly responsive to water propagation, which allows their roots to grow in much faster than soil.
Rex
Begonia rex is a very special species because, as you may already know, they can be propagated with just one leaf. This is a revolutionary hack for propagating these plants, as taking one leaf is far less annoying to a begonia than taking a whole stem cutting or cutting a bulb into pieces.
To propagate these hairy plants, simply cut off a leaf at its base, cut some small slits into each main leaf vein, and use a few small pebbles to hold down the leaf on top of a bed of moist, perlite-rich soil.
It helps to keep these pots of leaves enclosed with either a layer of plastic wrap (with room for the leaf to sprout) or a small plastic lid to maintain the humidity. Begonia rex can’t propagate without humidity, so be sure to mist every day until the new plants are about an inch tall, which should take about 5-8 weeks on average .
The amount of time it takes for each individual plant in each individual climate may vary due to these circumstances, but if you see your leaf begin to decompose, chances are that it’s not going to do its thing. You can try again using rooting hormone on the exposed leaf wounds.
You can also try stem cuttings with rooting hormone in water, but this isn’t always successful. Follow the same steps as you would with a cane or stalk begonia, cutting just below the node and dipping in rooting powder before placing into water.
Begonia Propagation Methods
As you may have gathered already from our talk about different propagation methods, there are a handful of ways that you can make begonias produce more plants without seeds. Choose whichever method seems the most comfortable to you, or the one you have the supplies for.
If you’re feeling adventurous, try a method you haven’t before; begonias tend to take well to propagation, so while you might lose one or two cuttings, it’s easy to start over again! Here are the best methods for propagating begonias.
Water Propagation Method

Water propagation is a great method for a ton of tropical and indoor plant species. That’s what makes it a good choice for tropical begonias; it’s simple, easy, and efficient. All you have to do is keep up the maintenance with minimal time commitments and you’ve got new plants! Here’s how it’s done.
Step 1: Gather your materials
Before you begin, it’s a good idea to have everything ready to go in one place. Make sure you have your blade or shears, rooting hormone, clean water containers, and your begonia. You can use rubbing alcohol or warm, soapy water to disinfect your tools.
It’s also a good idea to keep your workspace clean and sanitary. Pathogens that can spread from plant to plant like to stick around on surfaces, so cleaning them is an easy way to prevent your plants from getting sick.
Step 2: Make your cuts
Once you’ve got everything ready to go, it’s time to start propagating! Decide where you’ll make your cuts by identifying nodes, either on stalks, stems or bulbs. If you’re propagating rhizomes, cut them between main stems to separate new plants from old ones.
Now that you’ve made your cuts, you can go ahead and remove some leaf (if there is foliage present) by cutting leaves that are long in half to make them shorter. Remove any leaves on nodes that will be submerged in water; we don’t want them to rot.
Cutting the leaves in half on the new cutting will help to preserve some energy that would otherwise be wasted on leaf growth, and repurposing it to build a new root system. A cutting with smaller leaves doesn’t need to put as much work into maintaining them; they’ll heal on their own after being cut back.
Step 3: Rooting hormone
With all your cuttings freshly trimmed, it’s time to apply the rooting hormone. To do this, you can either roll bulbs around in a sandwich bag or on a tray in a minimal amount of rooting hormone powder, or simply dip cut stems into the powder.
It’s important to get these new cuttings into water as quickly as possible. Try not to cut too many starts at once, so that none of them end up going too long without access to water. The ideal time frame from cut to water is around 20 seconds, but you have a good minute to get this part done.
Step 4: Into the water
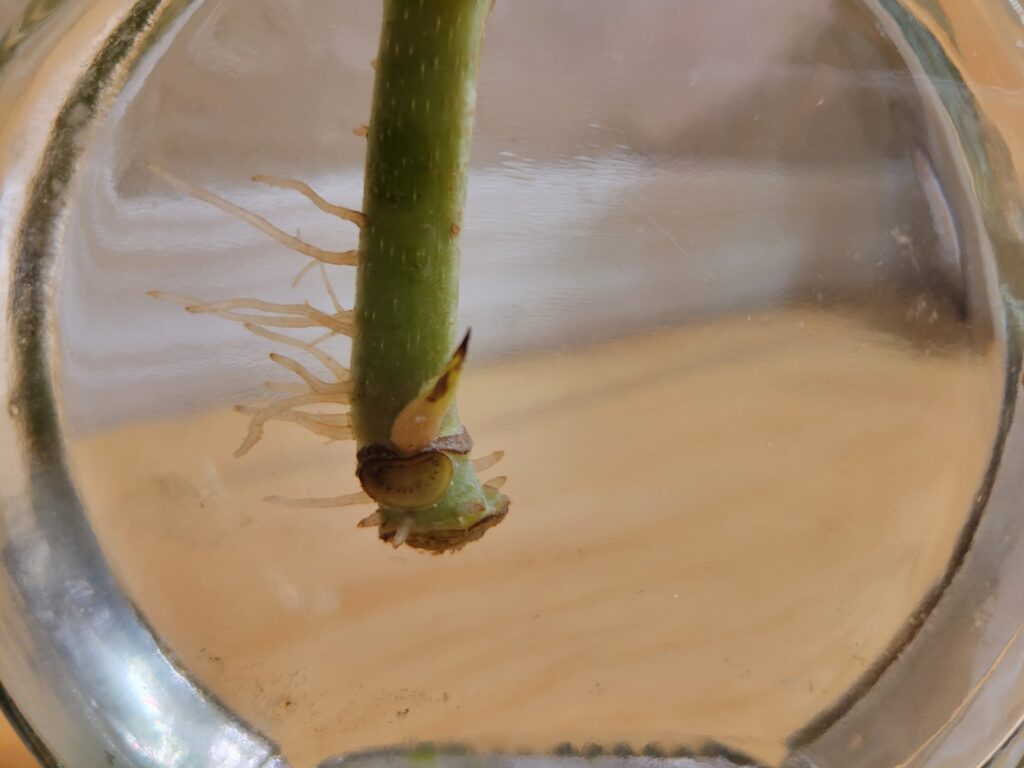
Your cuttings are now ready to start growing roots! Get them into fresh, clean water as soon as possible, carefully avoiding leaving any foliage (leaves or stems) sitting submerged in the water. From here, you should change out the water every couple of days to prevent any chemical imbalances.
The rooting process can take anywhere from 4-6 weeks, but may take longer depending on how much light the cuttings are exposed to. More light will produce roots more efficiently, but don’t overdo it; sunburn can set back rooting, as well.
Soil Propagation Method
The best part about soil propagation is that you basically start with a fresh pot of gorgeous begonia without the hassle of rooting first. The downside is that it takes begonias a few weeks longer to root in soil than in water.
However, if you’re up to the task of keeping them happy, your cuttings will prosper in soil. It’s a great way to watch the magic of rooting happen, since begonias start growing the moment they’re able to sustain themselves on new roots. Let’s dive in!
Step 1: Gather your materials
Take a few minutes before you start cutting up your begonias to make sure you’ve got everything you need in one place. It’s maddening to have to run around in circles looking for rooting hormone, especially when you need it in a very timely manner.
Don’t forget to grab some small pots filled with moist soil! Choose a few that are between three and four inches in diameter; anything bigger will promote root rot and other soil complications that can harm fresh cuttings.
This is also a good time to sanitize your work space and your tools with either rubbing alcohol or warm, soapy water. If you’d rather use something more convenient, try a plant-based, eco-friendly spray cleaner. Keeping things clean prevents plant diseases from hopping around from surface to surface.
Step 2: Make your cuts
Depending on which type of begonia you’ve got, making your cuts may look a little different, so be sure to check above to find out how to cut each type of begonia that’s suited for this type of propagation.
No matter which type of begonia you’re propagating, your cuts should be quick, clean, and as straight as possible. Bulbs and rhizomes can be tricky, but do your best; they’re forgiving. As for cane and shrub begonias, simply go below the node you want to start at.
Step 3: Rooting hormone
Now that you cut your starts away, they need to be treated with a rooting hormone, which will speed up the rooting process and prevent any damage from the plant going without roots for too long. A plant is only as strong as its root system.
For bulbs and rhizomes, toss in a bag with a small amount of rooting hormone powder, or dip into rooting hormone liquid. For cane/stalk or shrub and rex begonias, simply remove the bottom leaf from the node you cut at and dip the fresh cut into the hormone.
Step 4: Plant in soil
As soon as possible following the rooting hormone dip, plant your cuttings in soil about an inch deep, or until the soil sits just below the first leaf present on the stem. There should be enough length in the pot to hold the cutting up, but if you run out of depth, try trimming your cutting and repeating the rooting hormone process.
You can also stake up your cuttings with small bamboo stakes or anything similar, like pencils. Use a small clip or twist tie to secure the cutting to its support. Water in the cuttings to help them settle, then allow the excess water to drain out freely.
Step 5: Monitoring
The rooting process for soil propagation can take up to two months, but may take longer depending on how much light the cuttings receive. Wait for signs of new growth; when leaves begin to grow from the cutting, it has developed enough roots to sustain itself.
Of course, these cuttings need plenty of water and light throughout the entire process. Never let the soil dry entirely, and avoid placing cuttings in very low light, where they may not save up enough energy to grow roots and eventually wither away.
How to Repot Begonia Cuttings

After enough time has passed that your cuttings have grown themselves a nice, full set of roots, they’ll want to be repotted into something a little more roomy. Giving them a fresh, new home with plenty of space will trigger a huge growth spurt, which is really what we’re all waiting for.
To get this process started, you’ll need a pot with enough room to fit two fingers between the root ball of the plant and the inside wall of the pot.
Shallower but wider pots seem to help begonias avoid the tragedy of root rot, so stick with something that’s not too much deeper than the pot your cuttings are already in. You’ll also need some soil, which is always better with perlite in it. Here’s how to repot begonia cuttings.
Step 1: Unpot the cuttings
This step only applies to cuttings that have been grown in soil, but if you did water propagation, you can begin to free the begonia cuttings from their vases by carefully pulling out the roots from any tight spaces. Try not to let the roots dry out completely before they’re potted.
It is very, very important to avoid damaging the roots at this stage. Since they’re relatively new, they’ll be a bit more fragile than begonias that have been rooted for months. Take extra care to hang onto as many roots as possible.
Step 2: Prep the pot
After you’ve removed your cuttings from their rooting containers, fill up the new pots about one third of the way, or just until your plants can sit at the bottom with their roots still an inch underneath the top of the pot.
Then, set your begonias in the middle of the pot. You may need to hold onto it with one hand while you use the other to scoop soil in around the roots, which will start to build up enough that you can let the begonias stand on their own.
Step 3: Fill with soil
Now that the plants are firmly seated in their new homes, you can start to fill in the rest of the pots with soil, up until the roots are covered but the stem is above soil. Gently tap down the edges of the soil to help settle it around the roots.
Water generously until excess water drains freely from the pots and the new plants feel heavy. Once the soil is all saturated, the begonias are ready to finish maturing. Water frequently for the first two weeks, then as you normally would water the original begonias. Your new begonias are ready to start putting on growth!
Troubleshooting Begonias
Occasionally, begonias have a hard time with the propagation process. This can either be due to human error or simply an unhealthy plant. If you start propagating with a plant that is unwell, such as a begonia that is severely sunburned, infested with pests, or frostbitten.
If none of these situations apply to you, then there may be another cause. Here, we’ll look at some of the most common issues with begonias and how to fix them.
Slow or no root growth
If it’s been a few weeks since you took your cuttings and there are still no roots, it’s a bad sign that something wasn’t quite right during the propagation process. If you forgot to use rooting hormone, it may take quite a long time to grow roots, but there’s also a chance they won’t grow at all.
Similarly, a begonia may not sprout roots because of the way it was cut. Occasionally, if you happened to miss a node or the stem was a little too mangled from a dull blade, a begonia cutting will refuse to root. There’s little hope of saving it, but you can try recutting again.
The other most likely problem is too little light. If begonia cuttings don’t get enough light throughout the day, then they won’t grow roots; they’ll try to focus on preserving what foliage they have left. Bright, indirect sun or full spectrum LED light is best.
Wilting or dropping leaves
If your begonia is dropping leaves, it is absolutely not happy. Begonias drop leaves for two main reasons: bad growing conditions, and pests. Growing conditions can vary, though, from over or under watering to excessively cold or hot temperatures.
Try to be mindful about how much water you give your begonias. Allow the top two inches of larger pots and the top inch of smaller pots dry out before watering again liberally. There are also lots of great moisture meters out there that can help you determine how much water is being held at the bottom of each pot.
As far as pests go, look out for mealybugs, scale insects, or spider mites. Mealybugs and spider mites appear as white on stems under a magnifying glass, while scale insects range in color from white to tan to brown. Use some eco-friendly horticulture spray to rid your begonias of them.
If you do discover pests, immediately remove your infected plants from any areas where other plants are nearby. Touching leaves are enough to spread most pests, and some can even drop from one leaf to another nearby. Watch nearby plants for signs of pests as well.

Thank you Teri, This is very helpful advice for a budding spotted begonia lover! 😉
Thank you for the kind words!
I will be so excited if this works!! Thank you!
Hi Teri, what will happen to the plant where you take the cutting from? For example, on an angel wing begonia, will the remaining stem branch in two or will it just continue to grow straight as one branch?