
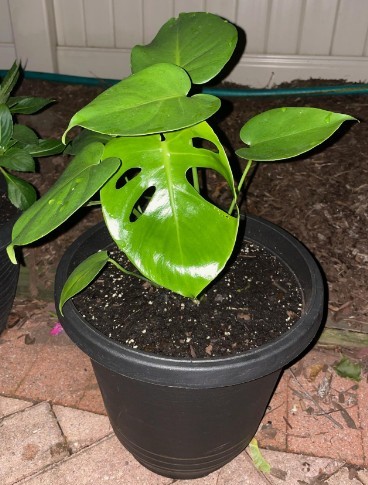
Also known as the Swiss Cheese plant or split-leaf philodendron, Monstera deliciosa, or more commonly just “monstera”, is a type of tropical evergreen plant native to the southern regions of Mexico and Panama that has become a wildly popular houseplant.
Monstera deliciosa features bold, glossy, deep green leaves with characteristic splits – called “fenestrations”- that reach out from the center of each unique leaf. Due to their easy-to-care-for nature and dramatic looks, monsteras are a low-effort way to add a show-stopping tropical feel to any room.
Anatomy of a Monstera
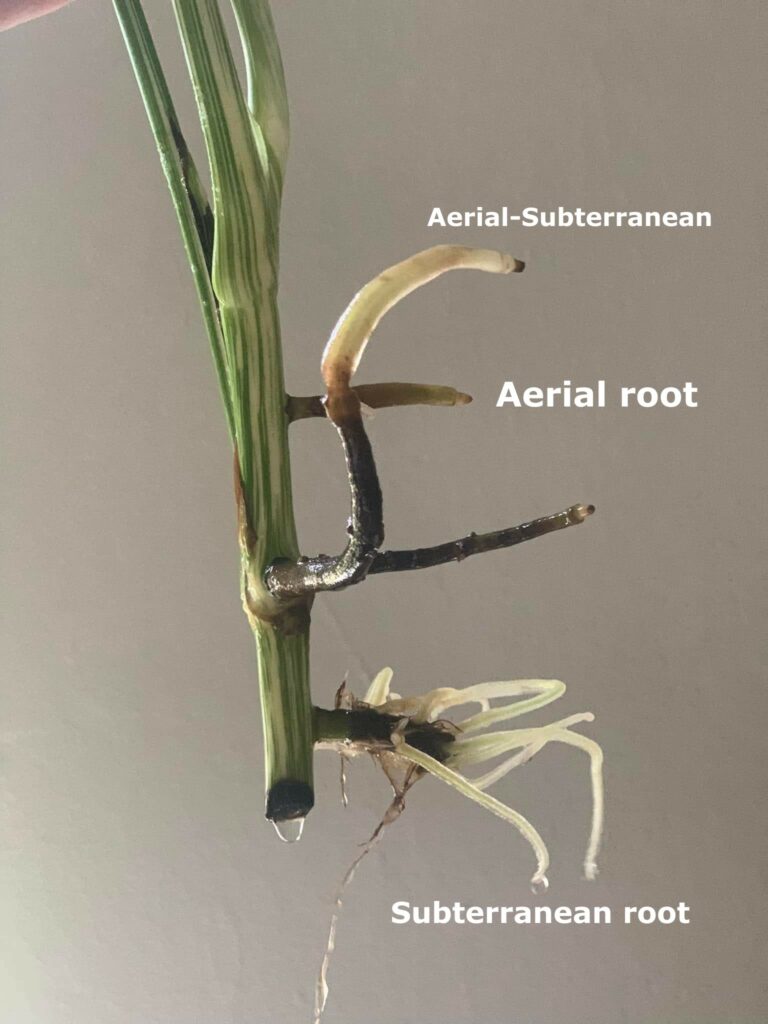
It’s important to get to know the anatomy of monstera, as we’re going to be going over the parts of the plant and what roles they play in propagating your mother plant. Starting from the bottom up, so to speak, your monstera has 3 kinds of roots: subterranean roots, aerial roots, and aerial-subterranean roots, but getting to know them isn’t as complex as it might seem.
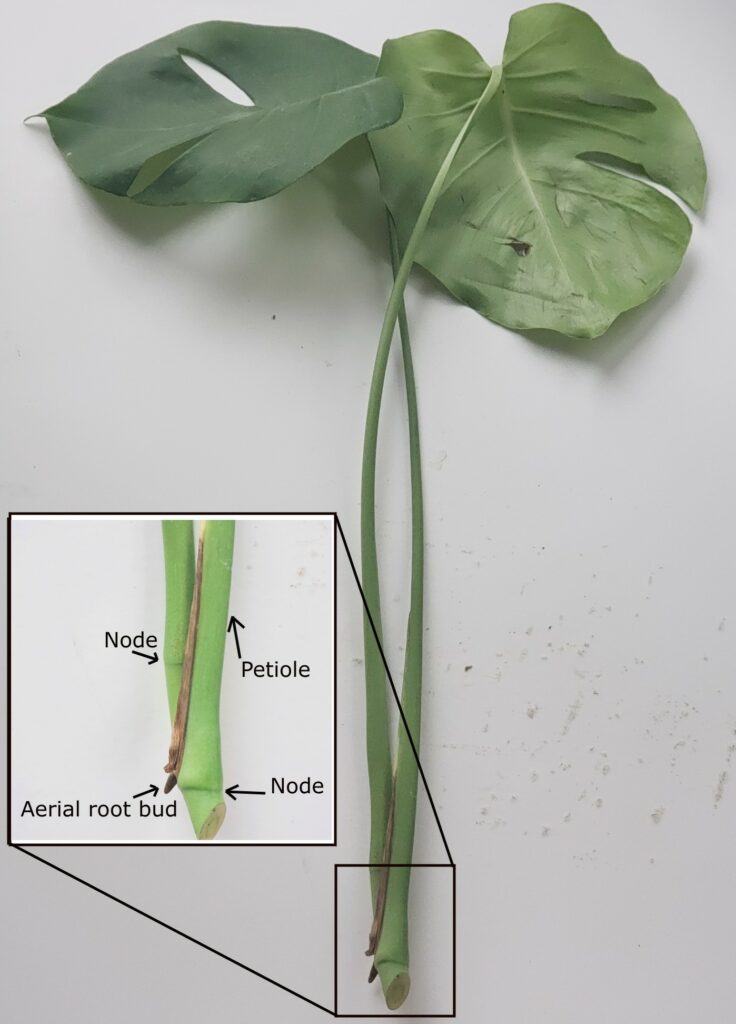
In general, all roots serve the same purpose: to give the plant some kind of support to hold onto something, and to absorb water and nutrients. Following along the stem up from the roots, you’ll arrive at the node and petiole, which extend to the leaf. If you look carefully in this area, you’ll also notice a small bump or protrusion. This is the axillary bud, which is the beginning shoot of a new stem.
Subterranean Roots
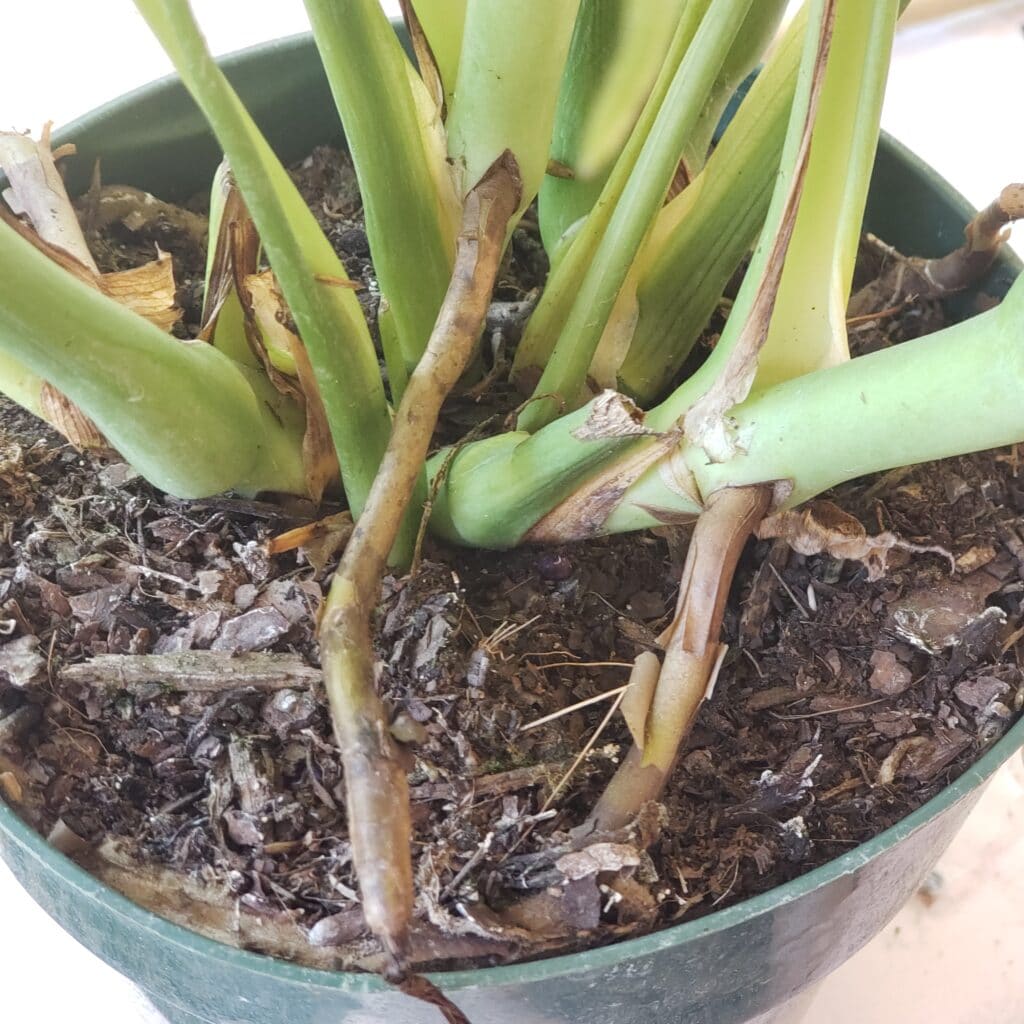
Let’s talk about roots. As mentioned above, monsteras have 3 types of roots. Under the soil are the subterranean roots. These anchor the plant into the soil to give it a strong foundation, and to absorb water and nutrients through the ground. These are also what we tend to think of when we think of a plant’s root system. These are the types of roots that you’ll be looking for when monitoring your cutting.
Aerial Roots
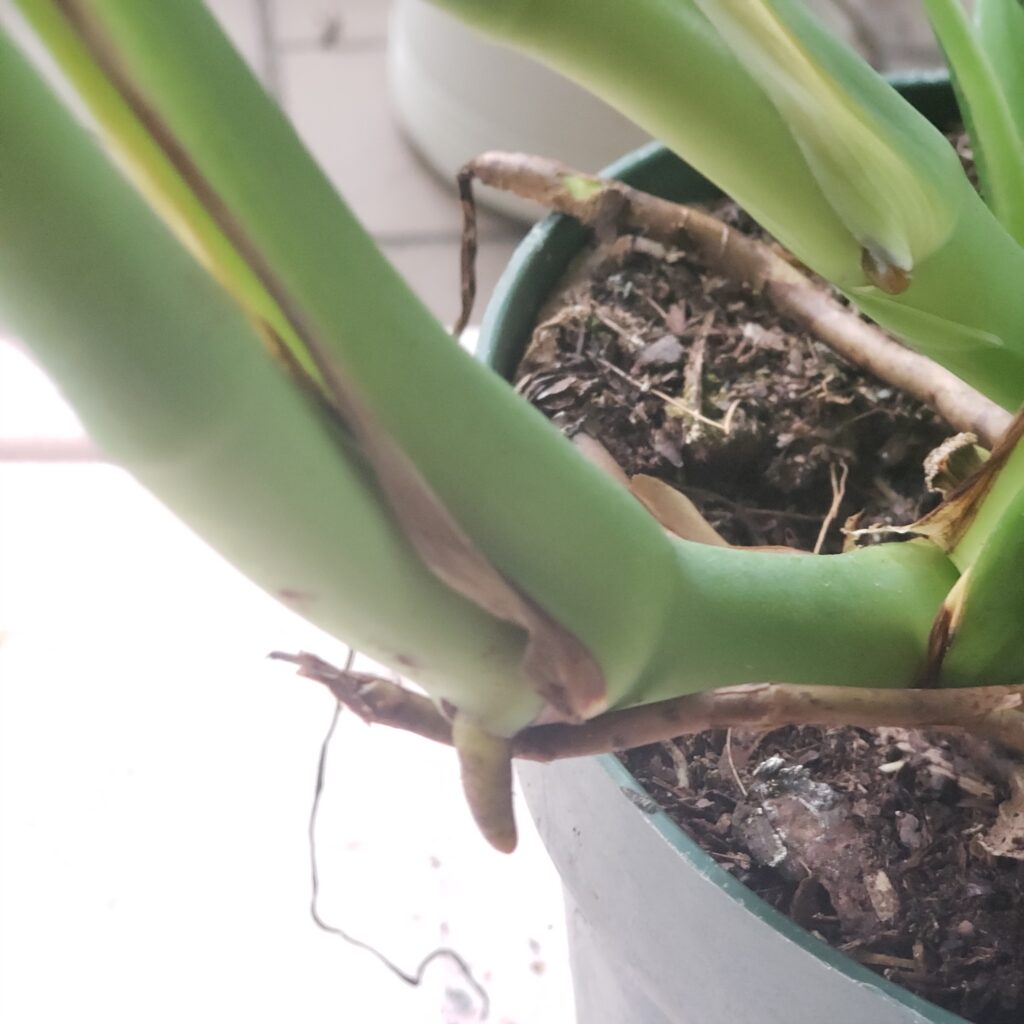
Monstera is a hemiepiphyte and a type of aroid, meaning that it will spend most of its life growing on something with the help of aerial roots. In the wild, monsteras grow up the trunk of a large tree, wrapping these above-ground roots around the trunk as it grows.
These aerial roots work the same way that roots in soil work: to stabilize the plant and absorb nutrients. As a houseplant, you’ll notice these aerial roots begin to emerge from the nodes along the stem. In the beginning, they’ll be nothing more than a small, white bud , but will eventually grow into a long, brown twig. If it’s been growing a while, you may also notice that it develops a brown, papery bark-like covering. This is totally normal and will improve its ability to absorb moisture or nutrients from regular spritzes of water or fertilizer.
Aerial-Subterranean Roots
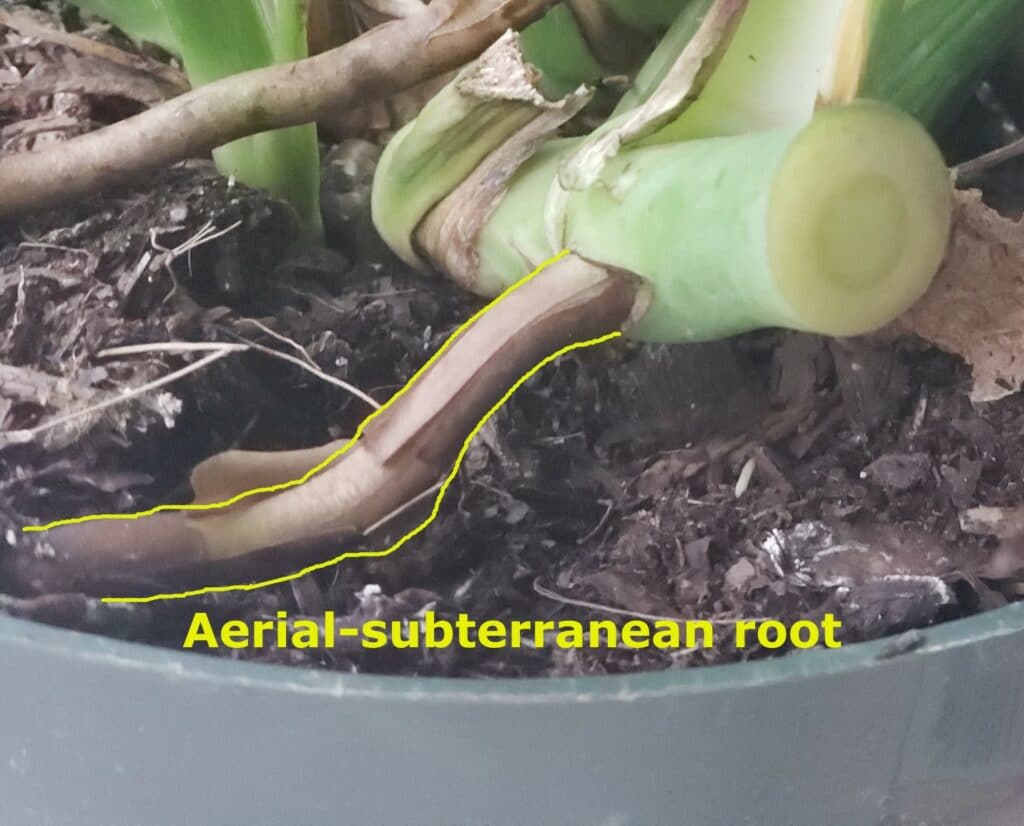
In between subterranean and aerial roots, there are aerial-subterranean roots. These are roots that began as aerial roots, but have now found their way into the ground. There are techniques to train aerial roots to become aerial-subterranean roots, but it really isn’t necessary if your plant is already well supported with something like a moss pole, and if the subterranean roots are in good shape. They’ll still absorb moisture and nutrients as aerial roots.
Node
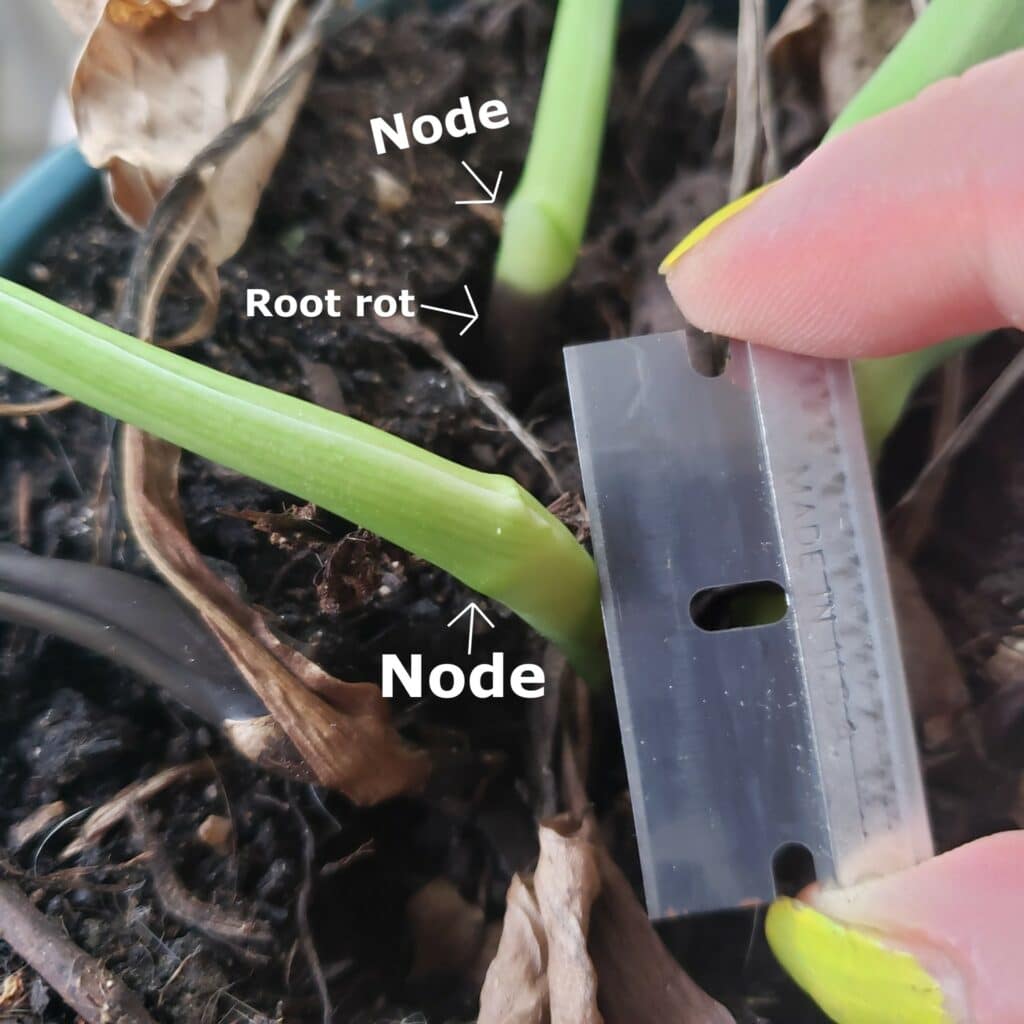
Next up is the node. When it comes to cuttings or propagation, you’ll hear a lot about nodes. These are pretty easy to spot on monsteras and other similar plants. If you’re unsure, find a leaf and trace it back to the stem along the petiole – the stalk of the leaf – to find where they join. This area is usually a bit knobby, kind of like a knuckle on your finger. So what is this almighty node and why is it so important to propagating your plant? Simple: The node is where your new growth is going to come from. In it are all the cells and hormones needed to produce new growth in ways that will help the plant adapt to its surroundings. In fact, you may already see new growth in the form of aerial roots beginning to emerge from the node.
As discussed further in another section, a node is absolutely necessary in order to propagate a monstera cutting. Although in some instances, a monstera leaf that’s been placed in water may sprout roots, but unfortunately, it won’t sprout any new leaves or a stem because there is no node to regulate the plant’s growth.
Axillary Bud
On the node, you may notice a small, greenish bump that is almost a protrusion, but not quite. This is the axillary bud and it’s the beginning of a new stem just waiting to be activated. If there was a break or cut in the stem just above this bump, a new stem would start to grow from it.
Monstera Growth Patterns
A young monstera looks quite a bit different than its adult version. The young plant, up until it’s around 1 year old, will have smaller, glossy, heart-shaped leaves that are missing the characteristic fenestration (the holes, or windows) on its leaves. As the plant matures and more leaves begin to appear, these fenestrations will become more common.
If your plant doesn’t have a lot of fenestrations just yet, give it time and plenty of sunlight; it’ll get there. But if you really can’t wait to have those characteristic leaves, try to find cuttings from older plants. Check your local nurseries that sell monsteras for cuttings of large leaves or even check out online plant exchanges and plant swaps.
In the wild, a monstera spends most of its life growing around trees, which is why they are categorized as hemiepiphytes. In the beginning, whether you’re working with a cutting or just a young plant, your monstera might be able to keep itself upright on its own, but at some point you will need to provide some kind of structure to mimic the tree that it would normally grow around. The most common method is to use a moss pole.
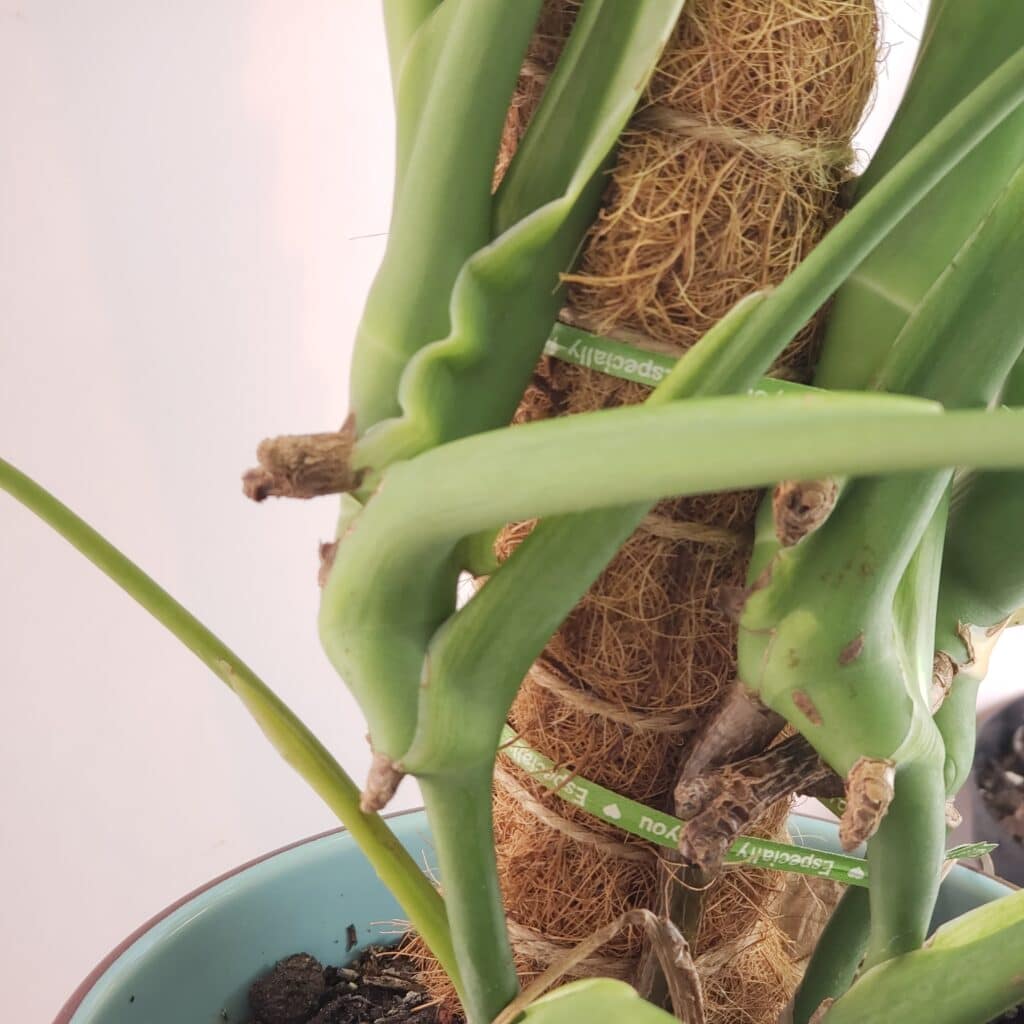
These can either be purchased online or from your local garden center or, if you’re a DIY-er, you can make your own from one of the numerous tutorials online. In addition to providing a physical support to secure your monstera to, they also help to train your plant’s growth, and even provide micronutrients to the aerial roots that find their way into the mossy covering. With aroids like monstera, having a moss pole can even provide an environmental trigger to start producing larger, more mature leaves.
How Fast Do Monsteras Grow?
Under optimal conditions, you can expect your monstera to grow between 1-2 feet per year. How big you let your monstera grow will be up to you. In the wild, these plants will grow up trees as high as they need to in order to get sunlight. In captivity, they’ll get as big as you let them, provided that their planter supports their roots and they have a permanent structure to cling to. When you notice that your plant is getting a bit tall for its space, or taller than you would like, snip off the top node or nodes to trim it down to size.
About Monstera Propagation
If you’ve ever tried to grow a plant from a seed and found it too unreliable or labor-intensive, you’re in luck! Propagation is a really simple method to take one plant (called the “mother plant”) and clone it. No more waiting to see if the seeds are viable or worrying about that delicate seedling phase. The best part is that you probably already have everything you need to start propagating plants in your home. Propagating is also a great way to handle a plant that has become too large or needs rescuing.
If you’re new to propagating, aroids like monstera are a very beginner-friendly species to practice with and can be propagated in a variety of mediums, like: soil, perlite or vermiculite, water, sphagnum moss, and leca. All you need are some common household supplies, a plant, and a container with your medium of choice!
Why Should I Propagate My Monstera?
Although there might be a number of reasons why you want to propagate your monstera, it’s easy to think of two big reasons: to break down a big plant into smaller, more manageable plants; and to save a rescue plant.
The question of when the best time is to take cuttings and propagate the plant can be answered by finding out which category your situation falls into.
The Mother Plant Needs to Be Trimmed Down to Size
In the case of needing or wanting to break down a larger plant, whatever the reason may be, it’s best to wait until a cutting with 2-3 nodes can be taken. Of course, it’s entirely possible (and very common) to take cuttings with only one node/one leaf, but having additional nodes can be very helpful with ensuring that the new cutting roots well. Regardless of how many leaves are on the section of the plant you cut, the most important thing is to make sure that the cutting has at least one node.
Like all other plants, a Monstera cutting needs a node, as that’s where the root system will develop. With a mature plant that has been growing for a while, you may even get lucky and find that your node has aerial roots already forming. If this is the case, then you’re already mostly on your way to a well-rooted clone! Congratulations!
The Stages of Monstera Propagation
Here are the stages on propagation that you should expect:
1. Unrooted
In this first stage of propagation, your cutting is fresh and has not developed any subterranean roots just yet. It is still considered an unrooted cutting even if it has aerial roots because these are not enough to sustain the cutting in a significant manner. Much of the energy from the photosynthesis of an unrooted cutting is being spent on sending out new roots.
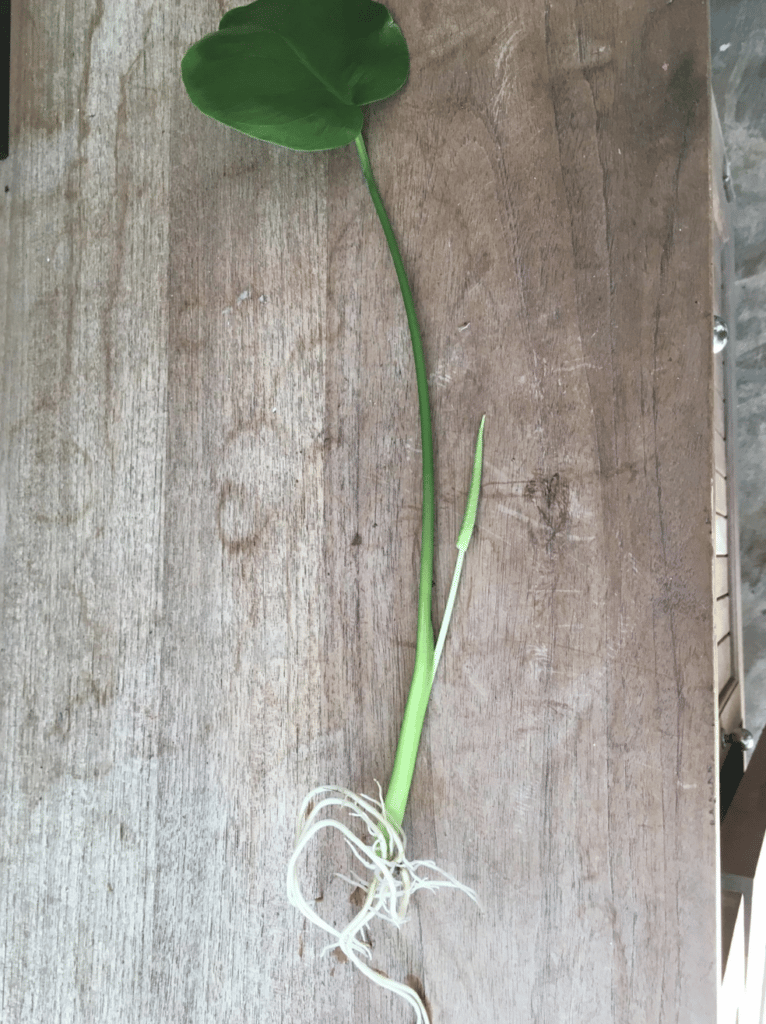
2. Rooted
Once your cutting has a full set of roots, not just the single root that the cutting will initially send out, it is considered “rooted”. If you are propagating in water, you will notice the beginning of this stage when you see what looks like a white taproot with hairs on it. These hairs will eventually grow into feeder roots that will help your cutting draw in more water and nutrients. Look for three offsets of roots, where you can see a root growing on a root, growing on a main root.
4. Established
Once the roots have grown longer, and the cutting looks ready to plant in its final medium, you can consider your cutting to be fully established. Congratulations, you’re on your way to a brand new plant! During this stage, you may not be seeing any “above ground” development; that is, new leaves. That’s okay! During this stage, your new plant is still sending its energy down to the roots so that the network needed to keep it alive can fully develop first. It’s also perfectly normal, once you’ve put your cutting in its new planting medium, for the plant to seem like it’s stalled out or wilting. Don’t worry, brief trauma is normal and your cutting should perk up again within a few days.
4. New Plant
If you’ve started seeing new leaves or new growth, congratulations! You now have a brand new plant! As long as your plant is properly watered, fed, and gets enough light, it should thrive for quite a while before it needs to be repotted.
How Much Light Do Monstera Cuttings Need?
Just like a mature, established monstera, it’s best to propagate your cuttings in bright, indirect light. In many areas, this usually translates to a southern facing location or any spot that gets at least 4-6 hours of bright, indirect light. Monsteras can tolerate low light or shady areas, but growth and development will end up being slower than if they received bright, indirect light.
How to Take Cuttings of Your Monstera
Monsteras are a great species for novice plant owners to practice propagation methods on. Their stems are thick, but easy to cut, and the plant’s nodes and possible root buds are easy for a beginner to locate and identify. Once a suitable cutting has been found, all that’s left to do is make the cut and wait. Well, that’s not ALL there is to it, but those are the major steps. Let’s take a look at two instances of taking cuttings: from a healthy plant, and from a rescue plant.
Above or Below the Node?
Because growth happens in the node, where you take your cutting – that is, below the node – is going to influence how it grows. If your goal is to take a cutting for propagation, cut the stem below the node itself. Once this node-end of the cutting is placed in water or whatever medium you are using it will trigger the production of a new root system. If your cutting happens to already have developed aerial roots, or even just the beginning bud of aerial roots, these will help spur things along as more roots begin to develop. Once a cutting is taken from the mother plant, trim any excess stem from just above the next node down to prevent rot and discoloration of the stem at this point. This is where new stems will begin to grow.
Types of Cuttings
Here are the three types of cuttings that you should be aware of when propagating your monstera:
Top
A top cutting is exactly what it sounds like: it’s a cutting from the top of the plant. This usually also includes the apical bud, the tip of the stem that produces new growth. You can find this by looking along the petiole of the last leaf of the stem for the bump of a new, emerging leaf.
Mid
Mid cuttings are those made after a top cutting. Both the top and the bottom of the cutting are cut, as opposed to a top cutting, where the top is the apical bud and the bottom is cut. A mid cutting will develop roots at the node and produce a new stem from the axillary bud on the node. Because this kind of cut requires that a new stem be formed, your initial leaves will not be as large or mature as the mother plant.
Wet Stick or Stem
Sometimes you may find yourself with only the node to work with. This can happen as a result of any number of reasons. While not having any leaves does make rooting the cutting far more difficult, it can be done. As there are no leaves to perform photosynthesis, it does take longer for the cutting to establish itself and send out a new stem and leaves. These types of cuttings need to be sterilized with rubbing alcohol only on the sides of the stem, and not the cuts themselves. They also need to be lightly covered with plastic and kept in a clean area, free of mildew, fungus, or pests.
What Supplies Do I Need?
Before we get cutting, let’s take a minute to prep our work station with everything we will need:
- Mother plant
- Razor blade, scalpel, or other sharp implement
- Alcohol (for sterilizing the blade)
- Honey or artificial rooting hormone (optional)
- Container(s) with whatever medium you will be using

When it comes to selecting your cutting implement you want to ideally choose something sharp enough to slice through the stem without damaging it. A dull pair of scissors or gardening shears is likely to crush the stem and cause trauma to the cutting, making it harder for roots to develop. A straight razor, scalpel, boxcutter, or other similar thin, sharp blade is best. A quick rinse in isopropyl alcohol to sterilize the blade will help to minimize the chance of the cut becoming infected even if the blade is new.
Making the First Cut
Now that you have all of your materials, let’s take our first cutting. With your sterilized blade in hand, locate the node where you want to make the cut and make a quick, clean slice through the stem. With other types of plants, it’s best to make the cut at a 45° angle in order to increase the surface area for root development.
Congratulations! You now have a brand new cutting that will hopefully develop into a new plant! Before you place your cutting into its container, dip the cut portion of the stem in the artificial rooting hormone or honey, being careful not to touch the cut in the process. If you plan on taking any other cuttings, follow the same steps.
Taking Cutting From a Healthy Plant
Taking a cutting from a healthy plant is easy, just find the top-most leaf and node and work from there. With a top-cutting, you may notice that the top leaf might show signs of producing another leaf, or one may have already started emerging. That’s okay! You can still take the cutting and propagate it normally.
How Many Leaves and Nodes Should I Take?
How many leaves and nodes you include in a cutting are limited. A safe-sized cutting that isn’t too big or too small is one that has between 2-3 nodes. However, more than that might leave your cutting struggling to get the water and nutrients needed to keep those extra leaves because of a lack of established roots. Single node and leaf cuttings will obviously start out as a smaller plant and are great for creating plugs that can later on be repotted with either other Monstera plugs or in a potted arrangement. Single nodes are also good if your propagation station is on the smaller side.
Taking a Cutting From a Rescue Plant
Maybe you came across a rescue plant through a plant exchange or had a Monstera that ended up with root rot. Whatever the case may be, you now have a plant that needs rescuing. Luckily, Monsteras are pretty easy to save using propagation methods! Unlike with a healthy plant, in the case of a rescue, you may not get to choose how many nodes to cut as the goal here is to save the plant from dying and give it a second chance. Although smaller or younger Monsteras might be harder to save using this method due to the lack of viable nodes, with more established plants, this shouldn’t be too difficult.
Finding Healthy Growth
First things first: find the bottommost healthy node and make sure that there are no obvious signs of rot or other forms of damage. Just as you would with a healthy plant, make the cut below that node, making sure that the cut isn’t too close to the node itself. From there, you can either propagate the entire cutting if there aren’t many leaves, or cut it down into multiple cuttings of however many nodes you want.
A Little Extra TLC
Although from here you can propagate the cutting(s) in whatever medium you like or have on hand, if you’re concerned about the health of the cutting, propagating in water with a couple of drops of hydrogen peroxide is your best bet in order to be able to monitor root development and make sure that the cut itself stays clean and healthy. You can also propagate in sterilized soil or perlite, but keep in mind that the cut in the stem is basically an open wound and bacteria can still get in. In order to prevent bacteria from getting in, raw honey/manuka honey or a rooting hormone gel are recommended to make sure everything stays clean and healthy, and to encourage roots to develop quicker. Remember, if you’re rescuing a plant, it may take longer to see healthy root development, so don’t panic if it’s been a couple of days and you aren’t seeing any root buds.
Caring for the Cut
Here are a few tips that you should keep in mind when caring for a cut:
A Cut Is a Wound
A cut in a plant is a wound, just like it would be for you or any other living being, so keeping that cut clean and free of bacteria is key to successfully propagating your Monstera, but you can’t exactly stick a bandage on a cutting so what can you do? Well, just like a cut you may get, your best bets are to: a) keep it clean and dry until a scab forms, and b) covering it until it heals. For option a, after you’ve made your cut, carefully let the cutting sit until the cut itself is dry, like a scab, before placing it in water or your chosen medium.
How to Use Honey
As for option b, you might not be able to put a bandage on a plant, but luckily there’s something you likely already have in your kitchen that can help to keep bacteria from growing and create a barrier over the cut while it heals: honey. Although any floral honey will work in a pinch, dark honeys like Chestnut, manuka, and heather honeys have the highest antibacterial properties.
Why honey? Honey is a natural antimicrobial and antifungal, it’s also packed with nutrients and, due to its thick nature, works as a physical barrier to any germs that might attack the wound site while it heals. All you need to do is smear a little bit on the cut part of the stem, place it in your container, and allow it to take root.
Should I Use a Rooting Hormone?
Whether or not you use a rooting hormone is up to you and what you are looking to get out of it. As mentioned above, honey is a great, easily available, low-cost, natural rooting hormone that is great for beginners and experts alike. Another option is to use a synthetic rooting hormone. These are most often available in a gel or a powder and work the same way: Take your cut, dip the cut end in the gel or powder, place the unrooted cutting in your choice of growth medium, and watch your cutting turn into a new plant. The biggest difference between the two is that a synthetic rooting hormone will usually encourage the root system of the cutting to develop quicker than with honey or no rooting hormone at all.
Pick Your Propagation Method
Monsteras are one of the less fussy plants when it comes to propagating them. Almost any propagation method can be used successfully. Below are some of the easiest and most common methods used.
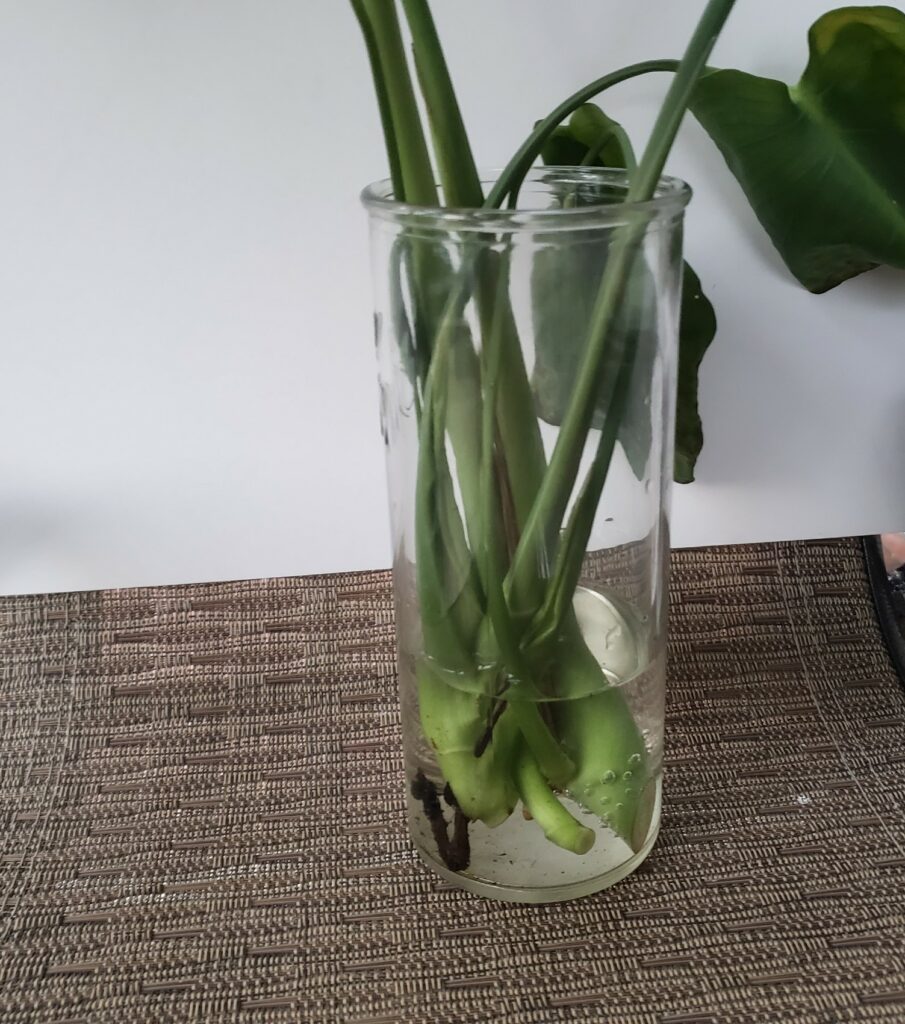
Water
If you love watching your plants grow or are just starting out, water is your best bet. It’s simple, readily available, and needs nothing more than a container large enough to fit your cutting(s) and water.
Water is also a great option because it can help you keep an eye on your cutting, particularly if you took your cutting from a rescue plant and are watching for root rot or are trying to avoid pests. There are tons of fun water propagation stations available for sale, as well as tutorials to make your own.
When it comes time to place your new cuttings in water, you don’t need much; just enough water to fully submerge the bottom node. Monitor the water level daily to make sure the cut is always submerged.
Soil
Soil is another easy choice for propagation, and thankfully, monsteras aren’t too picky about what kind of soil you use as long as it isn’t too dense. An all purpose houseplant potting mix that’s more on the fluffy side (versus one that is very dense and compactable) is a good choice for your cuttings and adult monsteras.
Soil provides structure for the roots as they begin to emerge, nutrients to promote new growth, and helps retain water. Soil is also a preferable method if you’re looking to establish multiple cuttings in a single pot.
When using soil to root your cuttings, making sure that your container has proper drainage is key when trying to avoid rot on the newly formed roots. Once your cuttings are rooted, your soil should be well-draining enough to dry out in the top two inches in between waterings.
Perlite and vermiculite
Perlite and vermiculite are commonly found additives in commercially available potting soils. In a soil mixture, they help to retain water, provide aeration to the soil, and aid with drainage. On their own, they are a great option for cuttings when you want to make sure they are properly watered, want to monitor root growth, and give those new roots something to hold onto. Perlite is a type of volcanic glass, can hold around 8x its weight in water, and looks like tiny, white pebbles or balls. Vermiculite is made from compressed layers of a dry, spongy silicate and can retain around 16x its weight in water.
Moss
Sphagnum moss is another easy way to propagate cuttings and works in very much the same way as using perlite or vermiculite. Sphagnum moss is a great option as it can hold a whopping 20x its weight in water and provides developing roots with ample airflow, which helps to ward off root rot.
To propagate your cuttings in sphagnum, create a mix of sphagnum and perlite or vermiculite and add enough water to dampen the mixture, but not waterlog it, and place your cutting in the medium. Make sure this mixture never dries out completely by checking it every day for moisture.
Replanting Your Monstera Cutting
Now that your cutting has developed a nice root system, you’re probably wondering when it’s time to finally plant it. If you started your cutting in water or water and leca, you can likely take your time repotting your plant so long as it’s doing well in the water or water/leca and is in a container with plenty of room. If you started your cuttings in soil, depending on how many cuttings you planted together will determine when it’s time to move on to a bigger pot.
While monsteras can spend a long time growing in water, it’s best to plant them in soil in order for them to reach their full potential and most dramatic looks. It’s a matter of surviving versus thriving. A monstera can, if properly cared for, survive in water that is properly maintained for quite a long time, but it’s likely not going to thrive in a way that lives up to its name. At the end of the day, monstera is not an aquatic plant, it’s a hemiepiphyte that will do best in soil and on a tree, or more likely, a moss pole.
If your cuttings are already in soil, simply transfer each cutting to a new container, or up to three in the same pot, at least six inches apart and water regularly. If your cuttings have been rooted in another medium, you can simply brush it off and plant in your potting soil of choice. For cuttings rooted in water, simply remove them from the water and place in soil deep enough to completely cover the roots and just about surround the node. Water more heavily for the first month to help roots establish in their new medium.
Help! My Cutting Doesn’t Have Any Leaves!
If your cutting doesn’t have any leaves, don’t panic. Whether the cutting got to you that way or it shed its leaves, you can grow new ones with some extra care and maintenance. If your cutting doesn’t have any leaves, follow the above instructions for rooting a “wet stick” cutting. New leaves will grow, but it will be a bit slow-going for a while until a new leaf forms. Until then, monitor the cutting for root rot or changes in the color or consistency of the stem.
