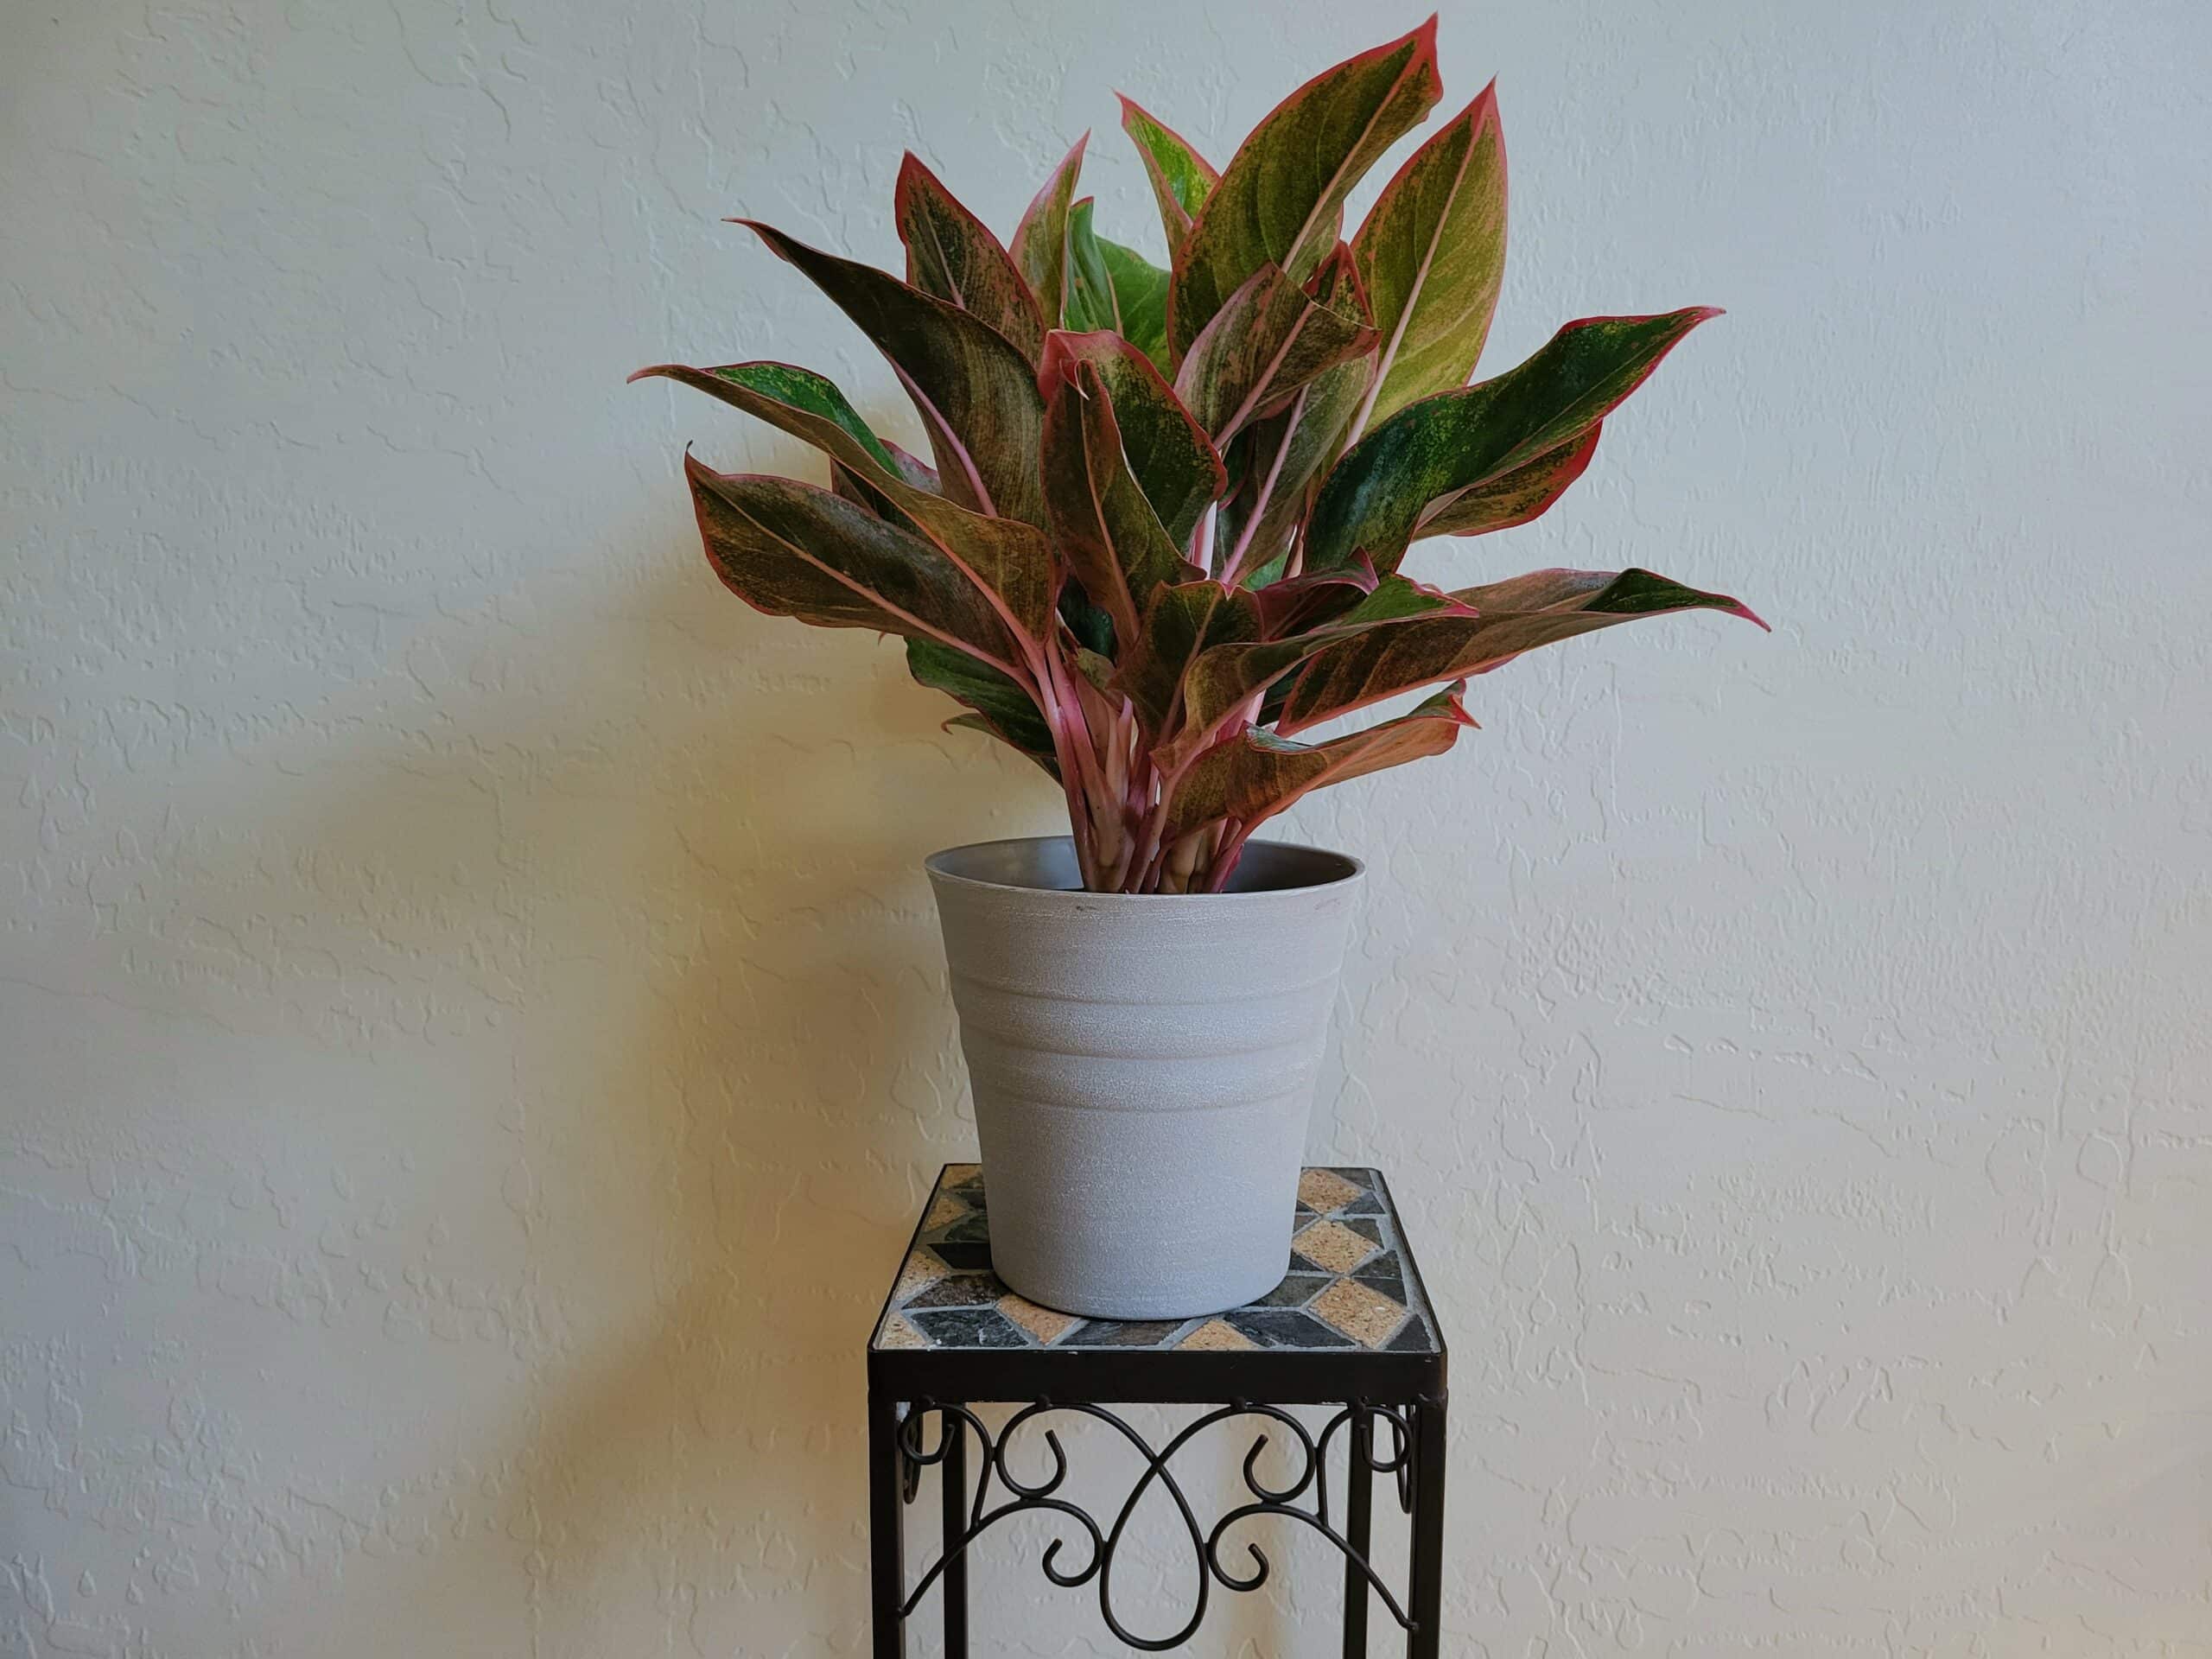
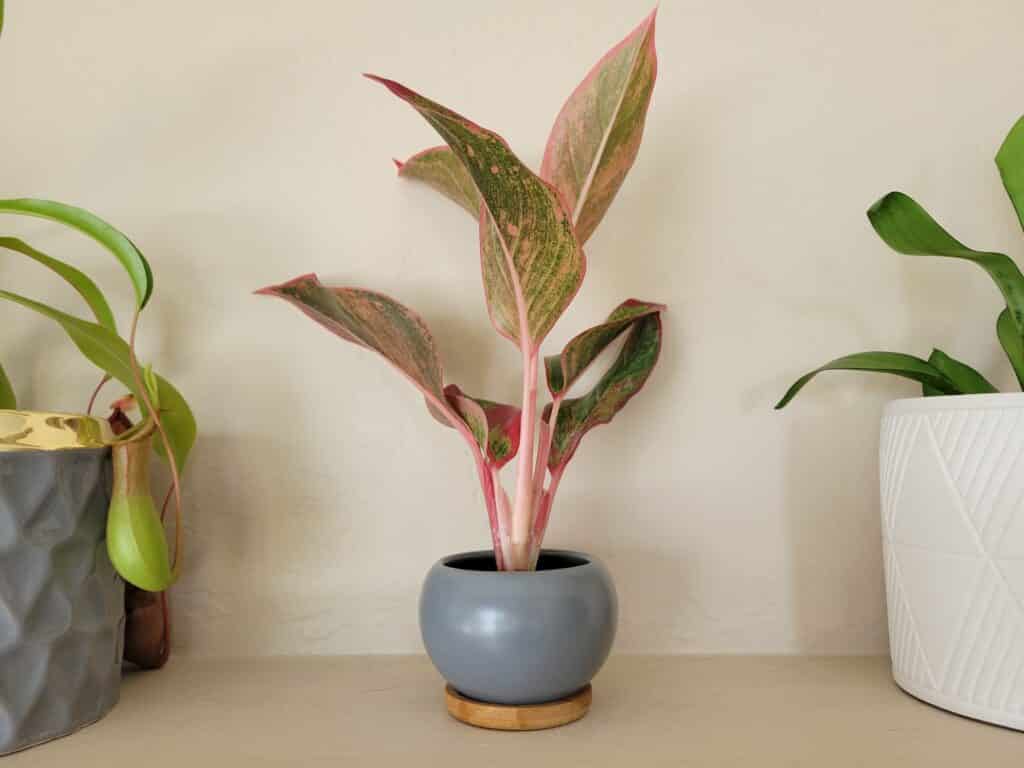
No plant species does it quite like aglaonema does. With its endless possibilities of neon pink, green, white, and red color patterns, this plant would easily win a vivid contest. It’s impossible not to notice the brightly colored hues of this plant in a crowd, which makes it even better when you finally find the right one.
Aglaonema is a plant that grows in a shrub-like manner, staying relatively small and bushy. This quality helps bring to life the extreme variance in color from leaf to leaf. It’s a relatively easy-to-care-for plant indoors, and can even withstand a bit of neglect, if it has to. Aglaonema is a great place to start for beginners that are new to houseplants!
History & Culture of Aglaonema

This plant is actually native to tropical regions of Asia, making it extra sensitive to cold temperatures. Despite this, aglaeonema was first introduced to European horticulturists in 1885, where it first began its long journey in the wardian cases of mankind.
Since then, aglaonema has been hybridized and divided into several different cultivars, many of which look nothing like one another. The variety this plant has to offer is what has modern-day growers so taken by it, going so far as to hybridize new colors and patterns all the while.
These days, aglaonema is all around us. It takes precedence in offices over some of the classics like ficus and dieffenbachia, both of which require more light and water than the ever-forgiving aglaonema plant. It’s also incredibly easy to propagate, which makes it all the better to keep as a houseplant.
Tools for Aglaonema Propagation
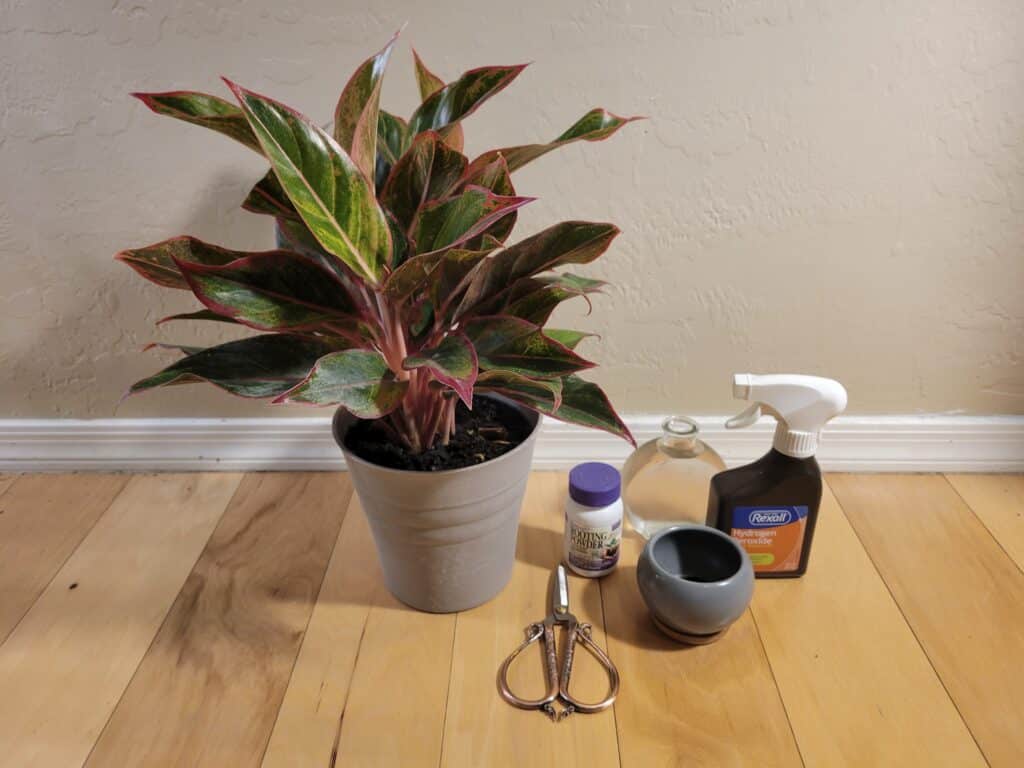
If you want to make more aglaonema plants for free, you must first have some tools on hand. These are just basic plant-keeping tools that you likely already have lying around, but if you don’t, most things can be swapped out for other items. Here’s what you need.
Plant shears
The number one plant tool for propagating aglaonema is plant shears. If they’re sharp, short, and clean, they’ll do. If you don’t have plant shears, you can swap them out for other items like new razor blades or even sharpened kitchen scissors.
The main idea is to use something that’s sharp enough to cut through plant stem like paper to minimize the damage to the tissue that’s been cut. Those cells will need to be able to build calluses, and if they can’t, they’ll simply rot away. Project doomed.
Rooting hormone
Next up is the plant-saving substance referred to as rooting hormone. Most of the time, this stuff will come in a small container in powder form. It can also be found in liquid form in clear containers, but this type is more often used in fruit tree grafting.
Rooting hormone is an essential part of plant propagation. It greatly increases the chances that your cuttings will take root and grow successfully before they run out of energy to do so. It’s also fairly inexpensive and nice to just have around for other plant-related projects.
Starter soil
Aglaonema plants like to grow in rich, well-draining soil. As such, they should be propagated in it. Soil for aglaonema cuttings should be a well-draining one with porous components like perlite or vermiculite to break up smaller particles.
This soil should be able to retain moisture well, as cuttings typically like to stay well-hydrated. Pre-mixed soil blends formulated for moisture management are perfect for this purpose, but feel free to try out your own soil blends.
Pots
During the rooting process, aglaonema plants are at their most vulnerable. Therefore, the perfect pots are key. Smaller cuttings should be planted in smaller pots from 3-4 inches, and larger ones should be planted in medium-sized pots anywhere from 5-6 inches.
The right sized pot isn’t just about roots. It’s also about moisture balance. A huge pot full of soggy soil will promote root rot in new cuttings, but too small a pot will dry out too quickly. There’s always a happy medium, and aglaonemas are fairly forgiving.
Water vase or container
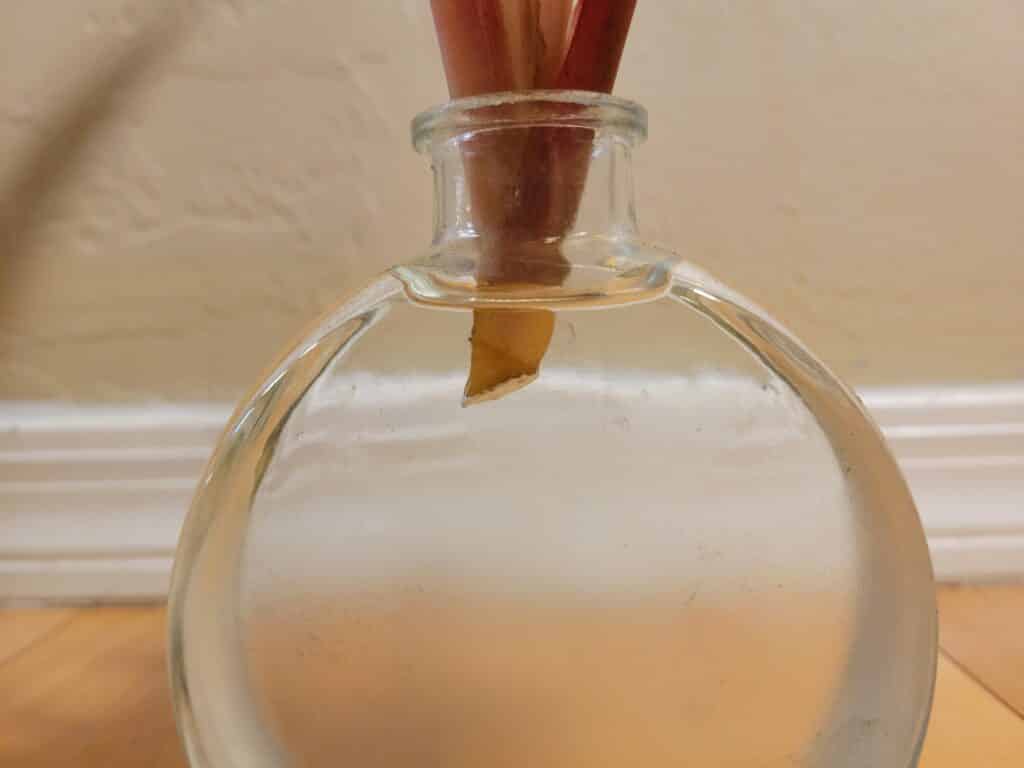
The right container for rooting your aglaonema is important. Most of the time, you can get away with a narrow-necked version of any clear vase or bottle, but be sure that you can reach down into it to clean it out properly during the rooting process. Propagation stations are the best choice.
Clear plastic containers can also work in a pinch; they may be less sightly, but they can certainly hold up to the task and serve the same purpose as a glass container. Whatever you use, be sure that it can support a cutting to stand upright without the bottom of the stem touching the container itself.
Types of Aglaonema Propagation
Unlike some of its counterparts and close relatives, aglaonema doesn’t particularly like to be divided by roots. In fact, most root cuttings or divisions will either die before they get the chance to establish or they’ll just never sprout, if there are no leaves present.
For this reason, aglaonema prefers to be propagated by stem cuttings. This is a quick and easy way to make more aglaonema plants on the cheap, without ending up with a ton of tiny plants. Instead of dividing large pieces of the plant, you’re just taking a stem here and there.
There are a couple of different ways to propagate stem cuttings that might come as a surprise, given that aglaonema looks nothing like most plants that can grow from any node. We’ll cover these methods, as well as some tips to help support your aglaonema plants during this process.
Here’s how to propagate aglaonema stem cuttings in two different, easy ways.
Water propagation method

The first and best method for propagating aglaonema is the water propagation method. Instead of planting in soil right away, this method calls for a period in water for roots to form uninterrupted by solids like soil or rocks.
It should be noted that this method does take a few weeks before planting, so be ready to have a dazzling array of cut aglaonema stems in water at your disposal. They look especially radiant in natural light, which they’ll need plenty of, anyway.
Step 1: Gather your materials
To really get yourself and your workspace ready to propagate plants, you’ll need to round up all the supplies you need for this method. Grab your plant shears or blade, some rooting hormone, fresh, clean room temperature water, and a clear vessel for holding water.
This is also a good time to get everything cleaned up and ready to go. Aglaonema plants are susceptible to several plant-borne pathogens, many of which are infectious. Clean and sanitize any tools and containers you plan to use and let them dry thoroughly before using.
Step 2: Locate your starts
Before you wildly hack up your gorgeous plant, take a few minutes to decide which stems the plant can live without. Is it especially busy on one side? If so, take stems from that side to help even things out a bit.
It helps to use twine or twist ties to mark the stems you’re cutting. It’s easier than you might think to cut the wrong stem, so be sure of which ones you plan to take before you start cutting. Once you’re happy with the balance of the stems you’ve chosen, move onto the next step.
Step 3: Making the cuts
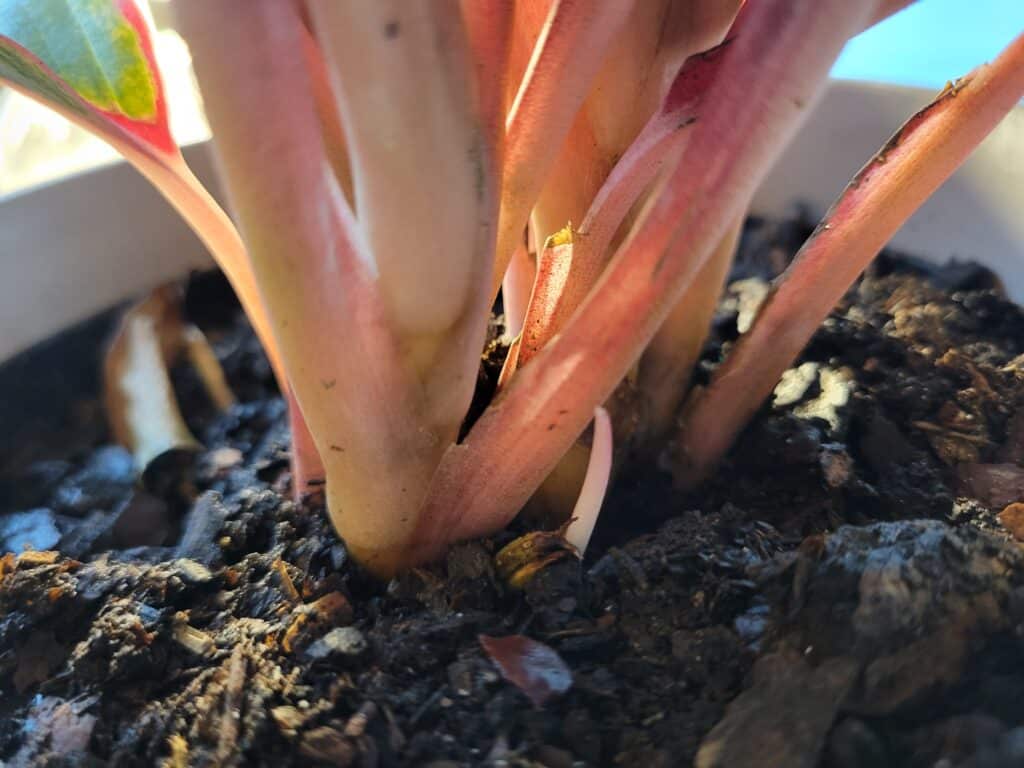
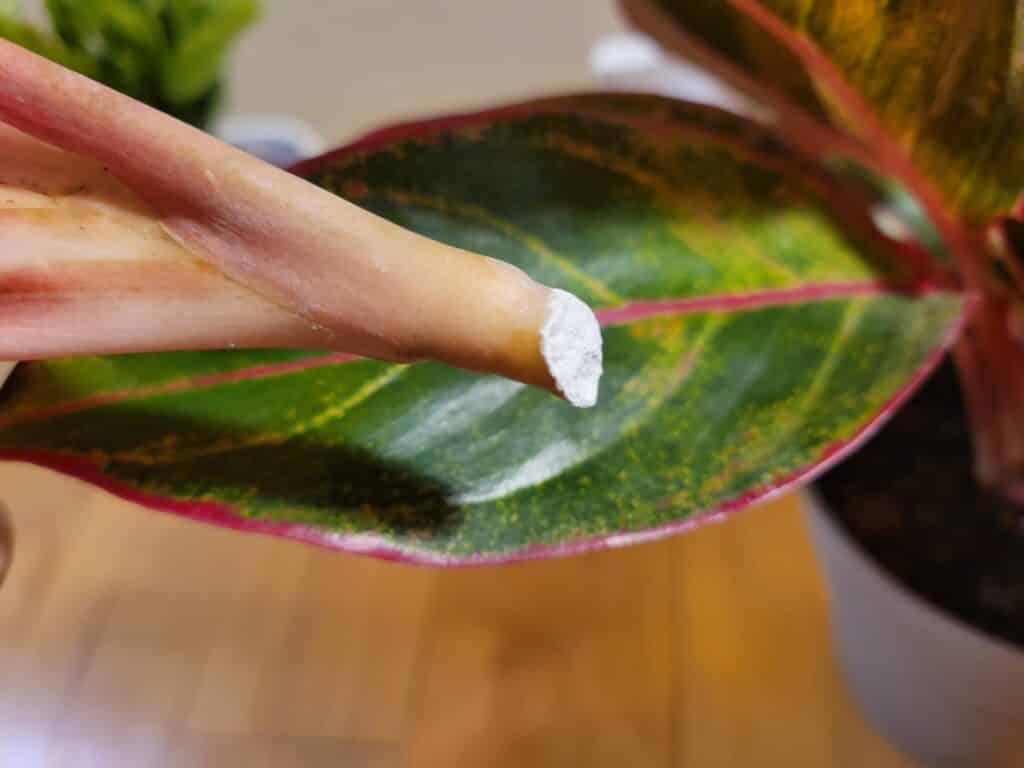
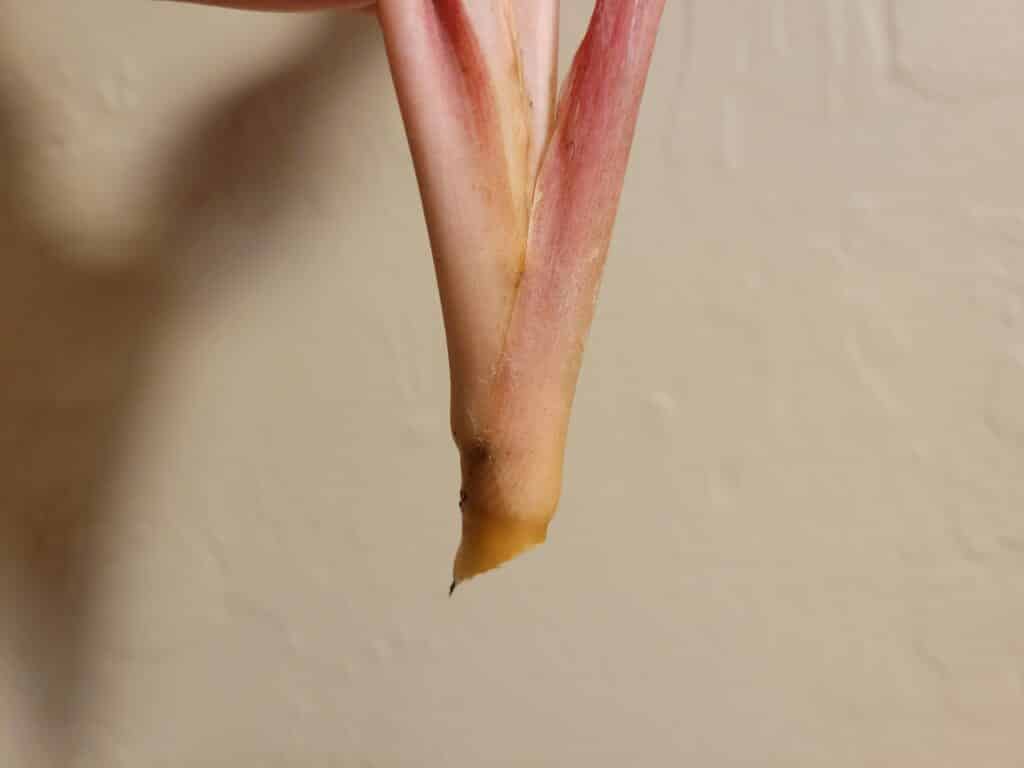
At this point, you may be wondering exactly how to cut away these stems. There is a process. First, locate the nodes that are at the base of each stem. You’ll see an area where the leaves branch off from one another; the nodes are located here.
You want to make your cuts swift and clean, just below the point where the stem bulges to let the leaves diverge. Check out the photo above for reference on how and where to cut. If you’re still not sure, cut as close to the base of the stem as possible.
Step 4: Rooting hormone
This step is all about long-term preservation of your cuttings. Any old thing can cause a plant to give up on the rooting process: temperature, humidity, sunlight, water imbalances, you name it. This stuff just helps to encourage the plant to root through thick and thin.
To apply it, just take your stems and dip them about a centimeter into the powder. There’s no right or wrong way to do this. Some will fall off, but that’s okay; you only have to worry about covering the actual cut at the base of each stem with the powder.
Step 5: Into the water
Let your cuttings rest for about a minute after they’ve been dipped into the rooting hormone powder. This just gives them some time to soak up as much of it as possible before it inevitably becomes part of the water.
Slowly lower each cutting down into the water. Try not to disturb them too much; being gentle will help prevent the rooting powder from flaking away too quickly. It’s okay if some of the powder sits on the surface of the water.
Step 6: Water changes
Every few days, change the water out for fresh, clean water in your rooting vases. By doing so, you’re preventing any bacteria or fungi from taking up residency where your cuttings are diligently trying to root.
It also helps remove the buildup of tap minerals from water which can become toxic over time. Thoroughly rinse the vases each time you change the water out, and if your tap is very hard, opt for bottled spring or distilled water.
Soil propagation method
To propagate aglaonema cuttings in soil, the process looks a little different. Of course, a few steps will look the same, but the idea is to encourage cuttings to root in soil so that they can start off their new life as their own plants right away.
The trouble with soil propagation is that soil is an environment where lots of little microbes hide out. These can be both beneficial and detrimental to the rooting process of your cutting. If it gets sick, it’ll die; but keeping a clean environment is the first step to good plant health.
We’ll go over the process of propagating aglaonema cuttings in soil, as well as how to find the right place for them to live while they grow up into mature plants. Keep in mind that soil propagation is a little harder to master than water propagation.
Step 1: Gather your materials
Prepwork is the best work. To make sure you have everything you need, go through and make a checklist. You’ll need pots, soil, rooting hormone, and plant shears or a blade. Make sure that the soil you use is pre-moistened, just enough so that water is easily absorbed.
Make sure that you thoroughly clean your tools and pots before using them to prevent the spread of plant-borne pathogens that can jump from surface to surface. Rubbing alcohol, soapy water, or hydrogen peroxide are all great options to get things sparkly clean.
Step 2: Locate your starts
At this point, start mapping out which stems to take for cuttings and which to leave alone. Try to make sure that the original plant is balanced, even after the cuttings are removed. If one side of the plant is fuller than the other, it makes sense to take cuttings from that side.
It can help to use some string or twist ties to mark which stems you plan to cut and where. You’re looking for stems that have several leaves, and have clear nodes, which are like bulging spots at the base where the leaves diverge.
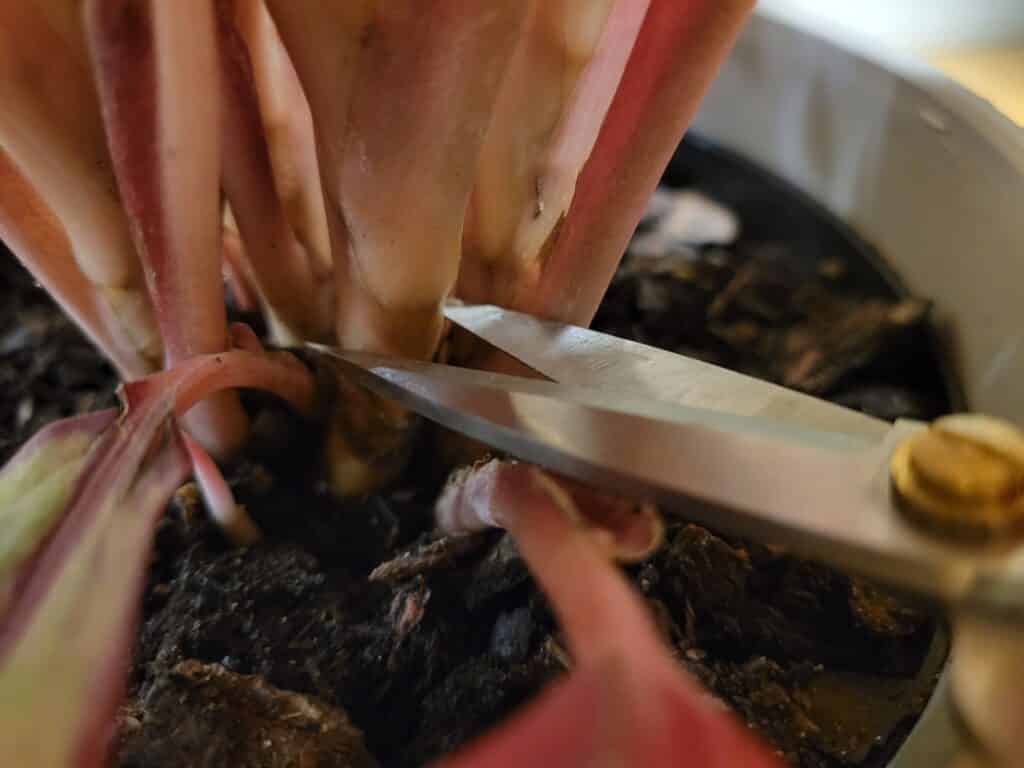
Step 3: Make the cuts
To separate the starts from their stems, you’ll need to try for a nice, clean cut. That’s why the sharpness of the blades you use is so important. Just below a node, use your shears or blade to make one swift cut all the way through the stem.
An angle isn’t particularly crucial for aglaonema plants, but it doesn’t hurt to put a little spin on it. An angled cut increases the surface area where cuttings can sprout roots, so this method can give you an advantage in that sense.
Step 4: Rooting hormone
You might be able to get away with not using rooting hormone for water propagation, but not for soil propagation. Cut stems with nodes may not take to moist soil alone, which is why rooting hormone is so useful in these situations.
To apply it, dip the cut stems into the rooting powder about a centimeter over the cut line. The goal is to cover the whole cut, so it’s okay if some of the powder falls off the sides of the stem. You can even gently tap it against the container to remove any excess to use later.
Step 5: Into the soil
Let your cuttings sit for a good minute before you insert them into the soil. This gives them the chance to soak up the rooting hormone and to start sending the right signals to the cells in the nodes, which will start the process for rooting once the shock wears off.
Gently insert the cut stems vertically into the moist soil, until they’re able to stand up on their own. You may need to remove a leaf or two to balance out the start, or you can use a bamboo stake to hold it in place.
Step 6: Water it in
Once you have your cuttings happily situated in their new pots, they’ll need to be watered in so that the soil is absolutely compact up against the cut stems, but naturally. Water will help the soil settle in a natural way so that your cuttings can access the moisture they need.
One big thing to note here is that water should never, ever be allowed to sit at the bottom of a pot, whether it’s a cutting or a mature plant. If you plan on using decorative pots, plant your cuttings in a plastic grower pot with drainage and then place that into the decorative option.
How to Care for Aglaonema Cuttings
Naturally, aglaonema cuttings need a bit more attention than the plants from which they came. That’s because they’re in a very fragile state that prevents them from caring for themselves. Without roots, a plant can’t absorb nutrients or large amounts of water, and it can’t protect itself from the many predators of new cuttings (sunlight, bacteria, you name it).
Thus, we must carefully look after our beloved aglaonema cuttings so that they can one day grow up to be big, beautiful, mature plants. Here’s a look at what needs to be done in order to keep your cuttings happy and healthy.
Light
While mature aglaonema plants may prefer to remain in moderate, indirect light, their cuttings need a little bit more to sustain themselves. Without the ability to photosynthesize, aglaonema cuttings simply won’t root. That’s why light is so important.
To provide adequate light, try placing your cuttings in an area that receives at least some kind of light all day long. Whether that’s a relatively sunny corner of an apartment or a southern-exposure bathroom windowsill, light is essential.
Watch for signs that may indicate too little or too much light. Foliage that seems wilted or weakened, as well as pale coloration, is indicative of too little light. On the contrary, browning or crispy edges of leaves are a sign that the cuttings are getting too much light, and should be moved back from the primary light source.
You can also opt for artificial light, instead, which is far easier to control than natural light. You get to decide what time the light appears, how bright it is, and how far away it is from the cuttings. Experiment to decide the best positioning for each cutting.
Water
Whether you chose to try water or soil propagation, the focus here is on the water. Both methods are dependent upon the right water balances. Ultimately, water is one of the main aspects of whether or not a cutting will survive to maturity.
Water propagated cuttings are going to be a little needier than those propagated in soil. It needs to be changed frequently, such as three to four times a week, in order to prevent a buildup of nitrates, bacteria, or even fungi.
By keeping the water as fresh as possible, you’re setting your cuttings up for success. The same sentiment can be applied to soil propagated cuttings, as well. The soil for cuttings should be kept moist up to the top half-inch of soil until new growth appears.
Water should never, ever be allowed to sit at the bottom of a pot that cuttings are planted in. Stagnant water in soil turns new roots into soggy, rotted strings in no time, which inevitably will kill aglaonema cuttings. Allow excess water to drain out entirely each time you water.
Temperature
Aglaonema is known for its preference for the warmer weather. These plants are tropic in nature, and so they must be kept tropic in captivity. Not to worry, though- the ideal temperature range for this plant is much like the average temperature in most homes.
For aglaonema cuttings, the temperature should never be allowed to drop below 70 degrees fahrenheit. The higher end of this is 85 degrees fahrenheit, but anything warmer than that is likely more tolerable than anything below 70 degrees.
If temperature is an issue for your setting, you can always try a heated terrarium, placing cuttings by a warm appliance, or even running a small heater nearby (not directly at the plants!). Try to keep your cuttings within these temperatures so that they can focus on growing, and not shivering.
