
Dracaena are one of those classic, timeless plants that just work in almost every setting, indoors and out. Their exotic look is peaceful and charming, and they come in so many colors it’s hard to only own one.
Aside from its ability to maintain popularity for decades, dracaena is also incredibly easy to care for and, as you’ll see later on, easy to propagate, too! They’re easy to find at most home and garden stores and in offices, hotels, and even landscaping, depending on the climate.
Case in point, these plants are perfect for trying to propagate if you’re a total beginner, or if you just want to make more beautiful plants!
Tools for Propagating Dracaena
As with most plant-related activities, you will need tools to propagate the healthiest new plants. These include items you likely already have laying around, and if you don’t they’re fairly easy to come by.
One trip to the local big box store or nursery would just about cover anything you need for this propagation project.
Of course, you can also repurpose common household items to fill in for something if you can’t run out and grab it readily. Here are just a few things that make most propagation projects much quicker and easier:
Plant Shears
The one most important thing to have at your disposal is a pair of plant shears. If you don’t have a sharp pair that can be used to make a rapid clean cut, then you can substitute for a good pair of kitchen scissors or a razor blade (rust-free, of course!).
However, as plant shears are designed to make quick work of the fibrous material that makes up a plant stem, they are always ideal. Shears should be sanitized before any cutting to prevent the spread of infection from plant to plant or surface to plant due to bacteria and other microorganisms.
Either dip them in rubbing alcohol and allow to dry, or simply wash them with soap and water, using a clean towel to dry them.
Rooting Hormone
Dracaena respond beautifully to rooting hormone. In fact, using a rooting hormone can get your cutting into soil up to two weeks faster than water alone, and can promote more new growth sooner after propagation in soil.
Rooting hormone essentially provides the nutrients necessary for a cutting to devote the bulk of its energy to coming out of shock and producing as many roots as possible, as quickly as possible. This will help to prevent any further shock or damage to a fresh cutting, giving it a bigger advantage and increasing its chances of survival. This stuff can be found at pretty much any big box store or nursery, and should only cost a few dollars.
Water Containers
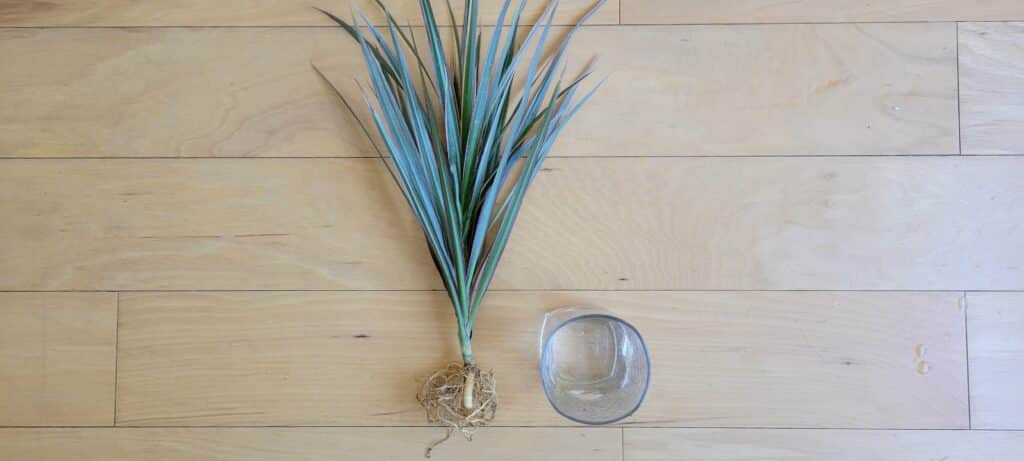
For water propagation methods, you’ll need a vessel that can hold enough water to support a busily rooting cutting, but can easily be rinsed out and filled with fresh water every other day or so. You can either opt for something like a propagation station, which holds numerous test-tube vases, or a basic water glass; whichever you feel works best for what you’re doing!
Make sure that each container is big enough to support a small root system of several inches long without binding them up too much at the bottom of the glass.
Plant Tags
Plant tags are great for jotting down important details such as cutting and planting dates, species, treatments, or other factors that might help to identify features of a cutting.
Commonly used plant tags include bamboo, birch, cedar, and plastic, though they can really be made with almost anything. If your local stores are out, you can simply make your own using some twist ties and labeled strips of paper covered in tape to waterproof them. No matter how you do it, labeling your plants is essential.
Planters & Soil
The keystones of plant keeping are things to grow them in. These include soil and planters. You’ll need an easy-going starter soil to start growing new roots in, as well as planters in varying sizes to repot your new plants as they develop.
Starter soil should be soft and contain peat, coco coir, and perlite. Pre-mixed starter soils work well, so long as they are moistened slightly first to help saturate the soil so that roots have an easier time reaching moisture.
That being said, it’s difficult to plant in soaking wet soil, so try to find a nice balance here.
Types of Dracaena Propagation
The two primary types of dracaena propagation are soil and water propagation methods. It’s easier and more reliable to stick with water propagation, but if you’re experienced with propagating plants and like to speed things along, you can go for the soil method, which calls for more attention, sunlight, and water.
Either way, both methods work great for propagating dracaena, and both have the potential to produce happy, healthy clones of the original plant. Here are the basic of each method:
- Water propagation method
- Soil propagation method
Water Propagation Method
For this method, you’ll need some water containers as discussed previously, as well as clean or purified water, rooting hormone, and some good plant shears.
Propagating in water is easiest because roots are the tell-all of a plant. If new roots are growing rapidly and appear to be thick and white, that tells us that the plant is happy.
In contrast, roots that look darker in color and aren’t growing well can alert us to an issue with the water, growing parameters, or cutting technique.
Here are the steps to take to use this method in propagating your dracaena:
Step 1: Gather Materials
The most important step is to get everything you need together and in one place. You’ve probably already done this if you’re someone who hates having to run around looking for things, and if this is you, then kudos; it’s easy to forget something when the moment arises!
Once you’ve got all the supplies listed above in one clean, dry place, make sure you have a good work surface to complete your cuttings and transfer them to the jars.
Fill your jars (or vases, or test tubes) with enough water to cover the bottom node(s) of a cutting without submerging too much foliage, which invites rot. The shape of the vessel makes a difference in how much water you add.
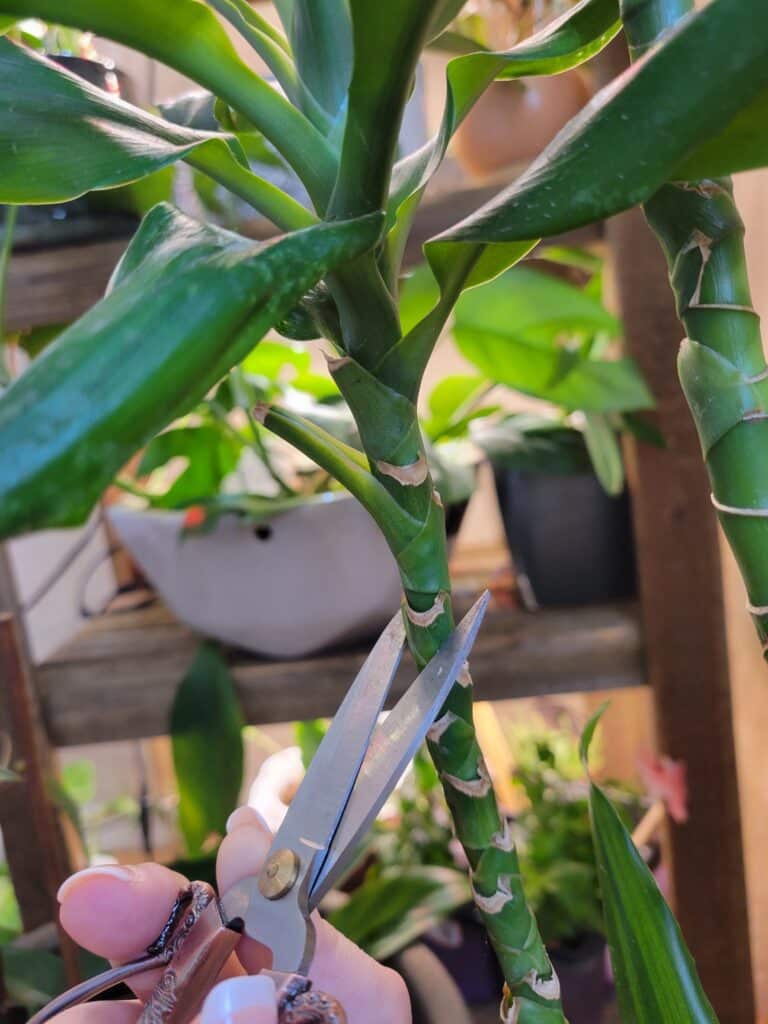
Step 2: Take The Cuttings
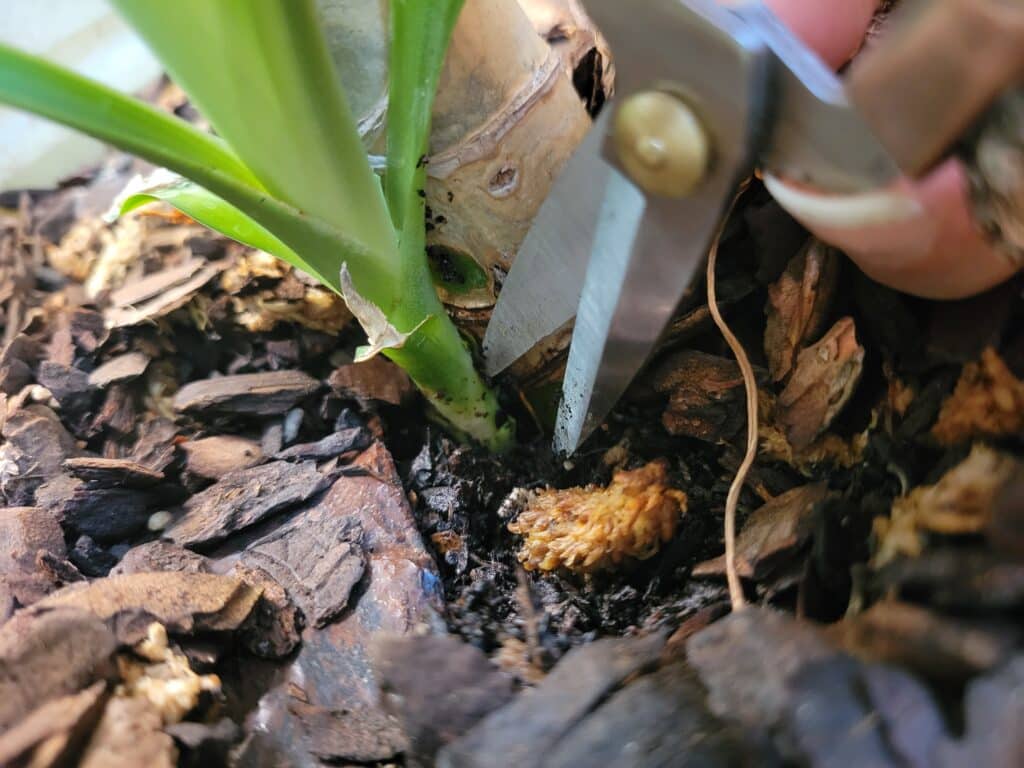
This is the tricky part. To take a cutting from a grown pup (which protrude from the base of the plant and are attached to the stem usually under the soil surface), try to cut as much of the pup away from the original plant as possible without cutting into either severely.
To take stem cuttings, cut at least three nodes away from the bottom leaf you want to preserve, making sure to cut as close to the node as possible without cutting into it.
In both cases, you’ll want several leaves on each cutting, so make sure you have enough to continue to photosynthesize without demanding too much from roots that won’t be there yet.
Step 3: Dip in the Rooting Hormone
As soon as possible after the cutting takes place, dip the freshly cut surface straight into the little jar of rooting hormone. If the stem doesn’t reach the powder, no worries; just shake the jar enough to spread hormone powder to the bottom centimeter or so of the stem.
Wait another 15 seconds or so for the cut to absorb some of the powder before dunking it in the water, where most of the hormone will dissolve into the water rather than stay on the new cut.
Step 4: In The Water
Down to the last step! At this point, just dunk your cutting gently into the water you’ve prepared, and place in bright, indirect light!
Keep the water in the vessel fresh, as leaving the water to get murky is the same as asking for your cutting to rot before it has the chance to root. A good rule of thumb is to replace water every other day; if you can’t commit to this, try to at least avoid letting the water become murky.
Don’t worry about washing out rooting hormone two days after you take the cutting, as the cutting has already used what it’s going to use at this point of the hormone, and the rest is null and void.
Step 5: Planting in Soil
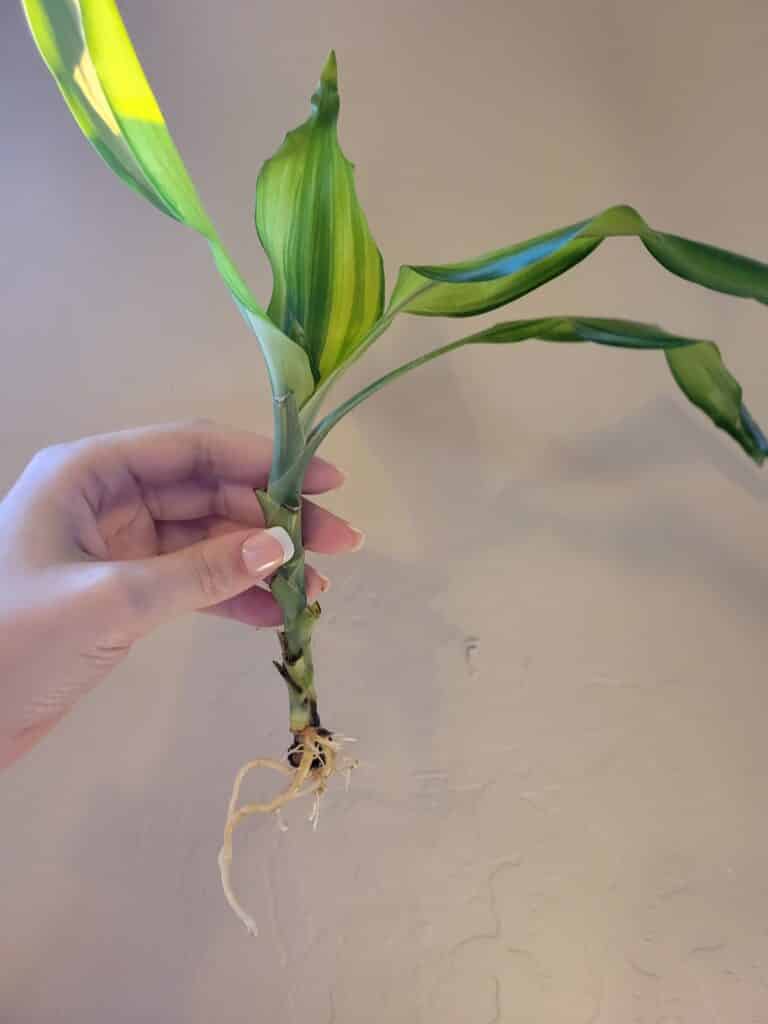
After a few weeks of excellent care and attention, your cutting should have a few sets of roots on them. With dracaena, roots should be well-established before planting if they’re grown in water.
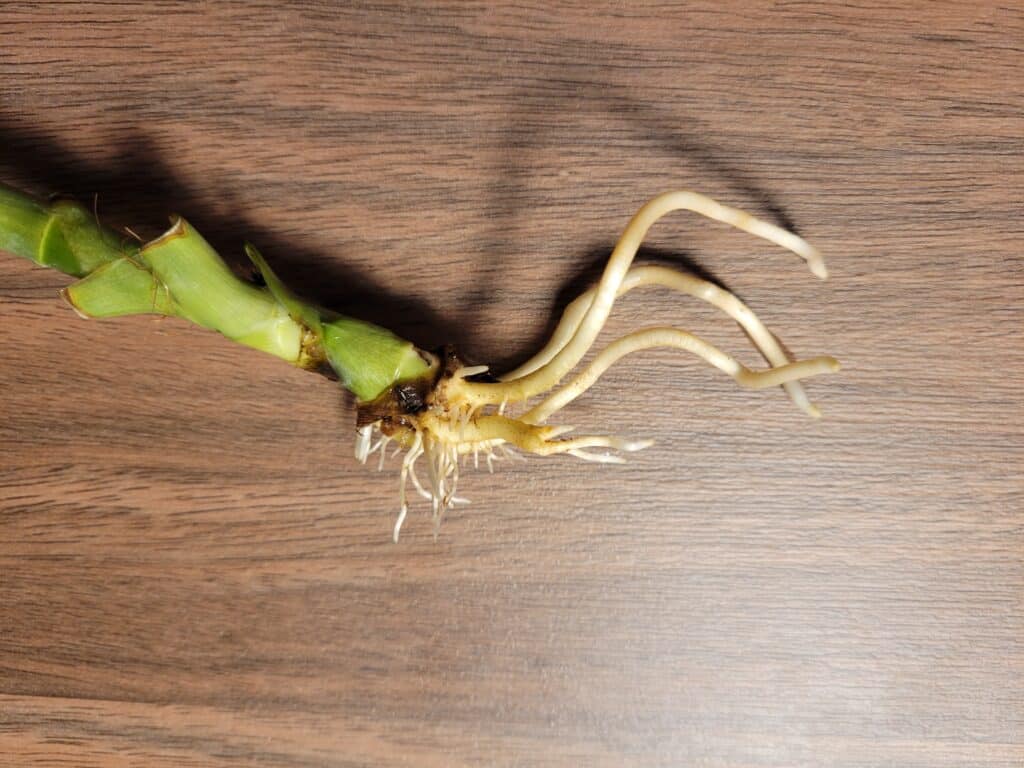
This helps to prevent them from drying out and becoming useless to the new plant. Look for three shoots off of one initial root; if there are signs that many new roots are growing in, it’s the perfect time to plant in soil.
Fill a small planter about halfway with soil, place the cutting upright in the center, then fill in the rest until the roots are all covered along with a portion of the stem. The cutting should support itself. Maintain moisture in the pot for the first month, then you can allow it to dry a bit between waterings to harden off roots.
Soil Propagation Method
Propagating in soil is a little trickier, and can be riskier in terms of rooting success. Occasionally, a cutting may just not make it. Either roots don’t grow fast enough to sustain the dracaena, or the cut stem simply rots away. However, if you have a bit more skill and experience with propagating plants, then soil propagation is worth trying.
Here’s how it’s done:
Step 1: Gather materials
Just like with water propagation, it’s important to have everything you need nearby before you begin.
That being said, soil propagation is a little more time sensitive than water propagation, so it may help to have things set up in the order they’ll be used. For example, have the rooting hormone open near the plant you’re cutting, and the pre-watered soil in a container right next to that. This way, you can snip, dip, and plant all in one swift movement!
Step 2: Take the Cuttings
This step looks exactly the same as with water propagation above. Follow the same principles of trying not to damage either the cutting or the original plant. If you do end up cutting into the original plant a bit, be sure to treat the area with cinnamon to prevent any pathogens in the soil from creeping in.
Move on to the next step as quickly as possible at this point to prevent the cutting from becoming too stressed.
Step 3: Dip in the Rooting Hormone
This part is important. The moment after you make your cut, insert the new cut straight into the powder, making sure to cover the entire bottom centimeter or so of the stem of the new cutting.
Shake off any excess to avoid making a mess, then, as fast as possible, move onto the next step. Moving along quickly preserves more cells in the plant that can be used to make new roots, which is more challenging in soil than water.
Step 4: Insert Into the Soil
Ideally less than 15 seconds later, push the stem of the cutting directly into pre-soaked soil. You won’t be watering for the first time until the next day, so make sure there’s plenty of moisture available.
Good drainage is essential here as well. Insert enough of the stem to make sure that the cutting can support itself upright.
If you cutting outright refuses to stand alone no matter what you do, you can use a pencil or popsicle stick (or even the plant tag) to prop it up. If you do this, don’t move or bump the pot for a week.
Step 5: Gently Press the Soil
In water propagation, you can just toss the new cuttings into a glass of water and call it good. However, with soil propagation, you must ensure that the wet soil is covering every square millimeter of the bottom of the stem.
Using your fingertip or a very small trowel, carefully press the soil around the stem in towards it to secure the soil and stem in place.
Now for the waiting game; water a small amount each day for the first month to promote new root growth. After that, you can cut back to a few times per week.
Step 6: Repotting
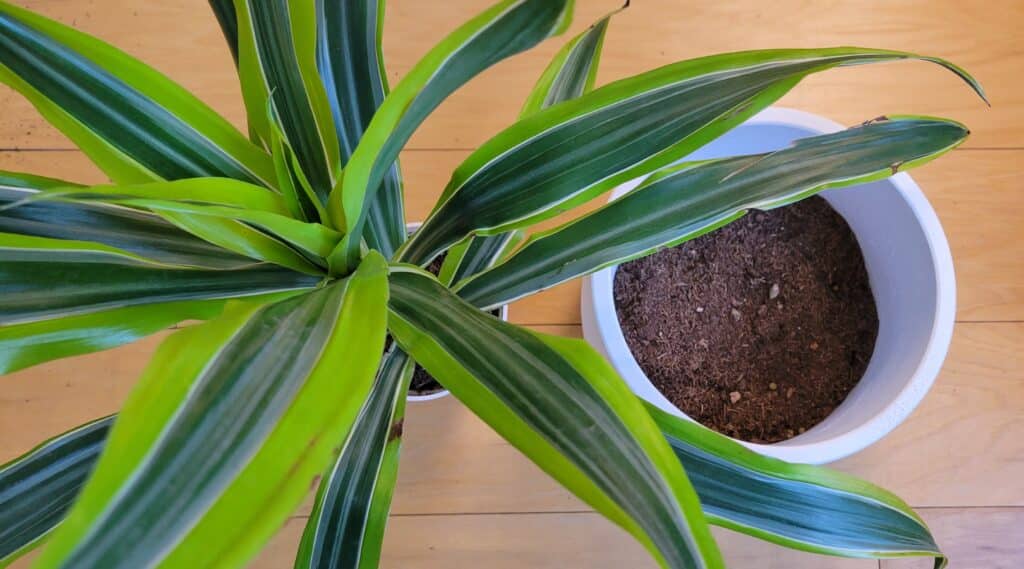
Once your new dracaena has grown enough roots for you to see bits poking through the bottom of the starter pot it’s in, it has officially graduated to a larger planter!
To repot, remove the root ball from the starter pot, gently shake loose some of the soil (without forcing any away), spread the roots at the bottom of a planter filled ⅓ of the way with soil, then fill in the rest.
Soil formulated for tropical plants is best, as dracaena thrive on the same nutrients that most popular houseplants do. Dracaena prefer plenty of perlite, so if your premix doesn’t have much in it, you can sprinkle a couple tablespoons of perlite into it for some added aeration.
That’s it, you’ve got a mature dracaena plant!
Knowing When to Propagate Dracaena
It can be challenging to know when the right time to propagate is. However, in most cases, it’s usually best to do so in the spring, when a new cutting will have the chance to grow more and the original plant will have time to invest more energy into the stems it still has, which will also help the leaves grow bigger and brighter.
You should only take a cutting when the pups have at least three sets of separate leaves (on separate nodes), or when you need to trim back your dracaena due to its size or an undesirable growth pattern (twisting, slouching, etc).
A cutting will need to be big enough to support itself on its own, but a cutting that’s too big may not be able to grow enough roots quickly enough to sustain itself during the rooting process. Try to keep cuttings to a minimum, as dracaenas are slow growers and cuttings can dramatically set them back.
Beginning Stages of Propagation
If you receive a cutting of a dracaena, chances are it’s still viable if only kept in water or a consistently wet paper towel.
In any situation where you’re not sure how long a cutting has been off the original plant, water propagation is best. However, you may also start with “wet sticks”- a term that broadly defines a piece of stem with no foliage or roots, which are very difficult to root.
In this case, you’ll need to dip both ends in rooting hormone, then gently place it lengthwise about halfway nestled into wet soil, cover with plastic wrap, an open sandwich bag, or even a clear, plastic food container, ensuring that there is still some mild airflow in the pot.
It could be weeks before you see any action, but mist with ample water each day to prevent the soil from drying out. This is really a 50/50 chance at success, but if you’re willing to try, it can be fun to see if you were successful!
Making the Cuts
If you’re still not quite sure exactly how to make a cut on a dracaena, fret not; these plants are absolutely not picky about how they’re cut, so long as there’s some space between the bottom leaves of a cutting and the stem cut.
You can cut at a mild angle to increase the area of water-absorbing cells that will be exposed, but this isn’t necessary most of the time. Just try to make sure that wherever you cut, there are either nodes from a stem cutting or a couple inches of stem for a pup.
Giving the cut some space really helps to encourage roots to grow, and also helps to stabilize cuttings in soil and keep leaves out of water when propagated in a vase or jar.
Caring for a Cutting
Once you’ve taken your cuttings, you will need to care for them until they develop roots of their own. Cuttings need lots of fresh water and bright, indirect light to really take off, and providing these amenities daily makes for a happy and healthy cutting.
For water propagation methods, change out the water at least every other day, rinsing the container to remove any debris or algae that might clutter the container and harm a fresh cutting.
Similarly, make sure that you water a soil cutting every single day to prevent the soil from drying. If the soil dries, the cutting dies.
Cuttings already have very limited access to water since they have no roots, so providing water directly to the stem either via wet soil or clean, fresh water in a vase is absolutely necessary.
What to Expect From Here
For some, the process of waiting for new roots to grow takes much longer than expected, but that’s because it does take quite a while for new roots to show up from a cutting. Healthy, stable roots can take anywhere from a month to three months to grow depending on the plant itself, the propagation method, and the growing parameters.
You can offer your plant warmer temperatures and bright, indirect full sun each day to help speed things along, but the rooting hormone is the primary key to growing roots quickly. You’ll know when it’s time to pot or repot your cutting when either the roots in the water are beginning to circle the bottom of the water vessel, or roots are beginning to show through drainage holes at the bottom of the pot for soil propagation.
Once you pot your new plant into a larger planter, it is a mature plant that will continue to grow and sprout new leaves. At this point, you can water as you would any freshly potted plant, and then on the same schedule that the original dracaena follows for watering.
As a basic rule of thumb for most plants, wait for the top inch or so of soil in the pot to dry before watering again, but this can vary depending on how deep the pot is and how big the plant is in comparison to the planter.
Try to water once you notice that the top of the soil looks visibly dry, then go for it! Dracaena are very tolerant of accidental or occasional over and under watering, so they won’t fuss if you water too soon a few times.
These are great plants to try out with propagation!
