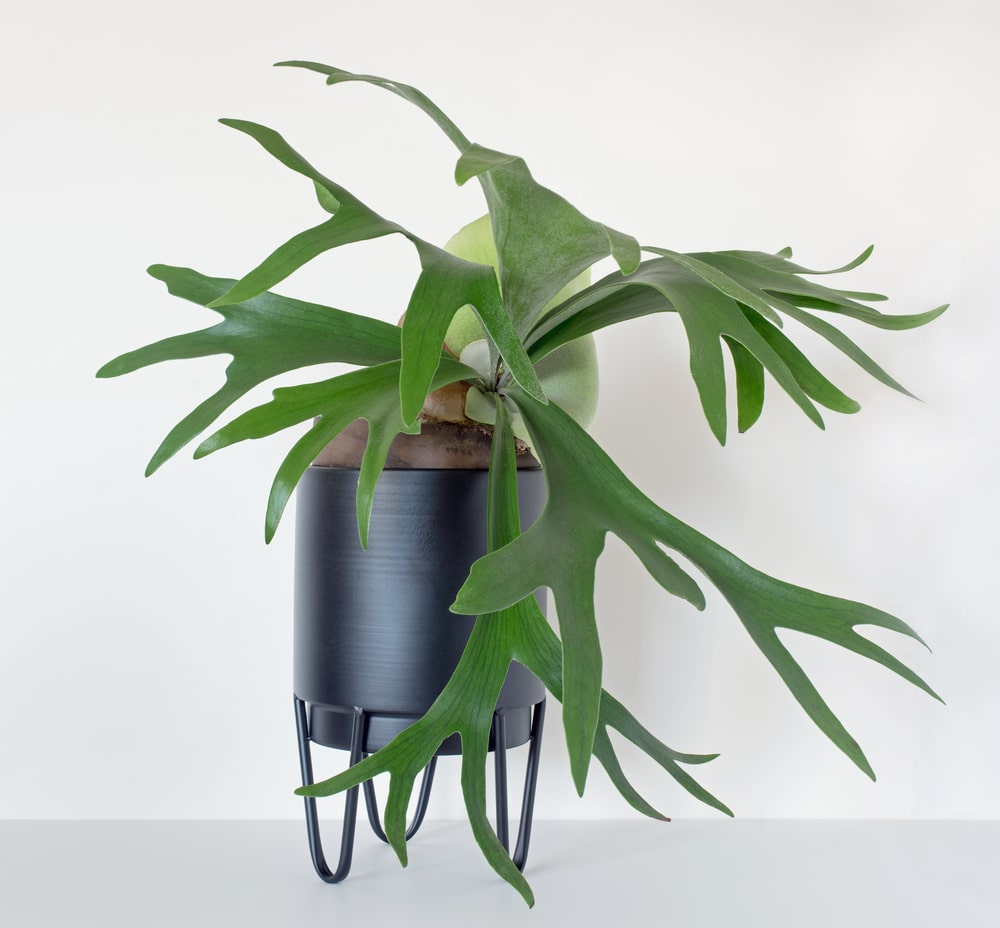
A mounted Staghorn Fern is a living piece of art, striking and impressive with pronged fronds that stretch out to show the world their beauty. Staghorn Ferns (Platycerium sp.) are newcomers to the houseplant world. But, they have quickly become a must-have for every plant lover because their growth is so impressive.
Staghorn Ferns are a little fussy about care, so it is vital to know the basics before acquiring one. Their anatomy differs from most other common houseplants, including most other ferns. However, they’re not difficult to care for, just very different.
Staghorn Fern Origin and History
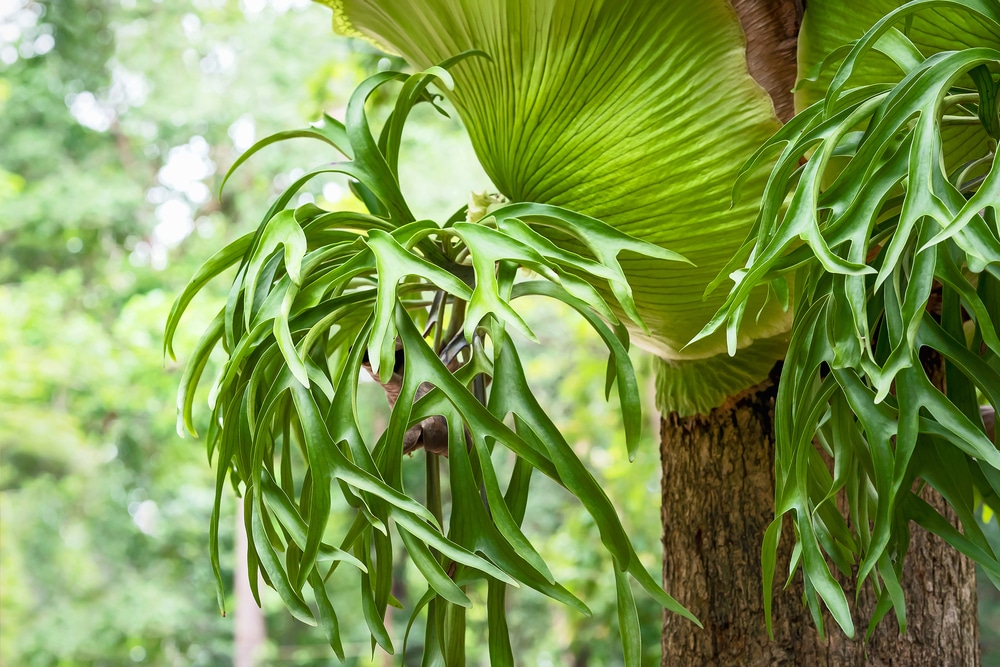
These unique ferns are native to South America, Australia, New Guinea, Africa, and Southeast Asia. Staghorn ferns are tropical epiphytic plants. They grow on the surface of other plants and gather their nutrients from falling rain and the air around them.
Also known as Elkhorn Ferns, Staghorns get their common name from their resemblance to deer antlers. They look so much like antlers that a popular way to display them is mounted on the wall, like animal horns.
The most popular Staghorn Fern houseplant is Platycerium bifurcatum, which is from Australia. There are other species available from nurseries, too. Their care is generally the same, but P. bifucatum is by far the easiest to obtain and provide care for.
Staghorn Fern Anatomy and Growth Habit
Staghorn Fern fronds emerge in two forms: fertile and sterile. The two types of fronds look and grow quite differently.
The fertile fronds are the forked, antler-like leaves that give it its common name. They average 5-18 inches on the common staghorn and are green to grayish-green, deeply forked, and arch up and out. Spores form on the underside ends of the antlers and resemble brown fuzz. They should never be removed.
The sterile fronds are also called shield fronds. They are hard, rounded, roughly heart-shaped, and surround the base of the plant to protect the roots. Shield fronds grow flat against a backdrop (in the wild, the tree) and overlap each other to create the shield.
When young, the shield fronds are dull green, but they turn brown and dry out as they age. This is entirely normal, and these leaves shouldn’t be removed either. As the fronds die, they provide nutrients to the plant. The sterile fronds of the common staghorn grow 30-40 inches long.
Both types of fronds grow out of a root ball base. The roots are minimal since it is an epiphyte, but this means they need extra special care. These roots are how the plants attach to a tree and require exceptional drainage, so they don’t rot.
Staghorn Wall Mounting
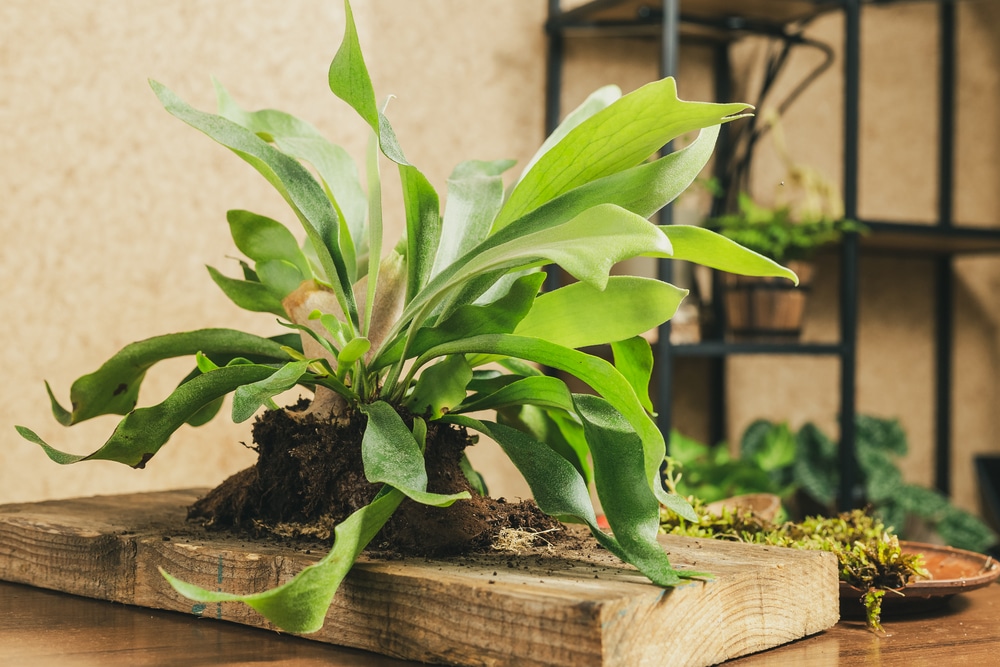
Staghorn ferns will maintain well in a growing medium when they are small, but they won’t thrive there. However, young and mature ferns look amazing mounted on a wood base, bark slab, or hanging out of a wire basket. Most people choose one of these options for their mature staghorn to really show off its spectacular foliage.
- You’ll need a board (untreated so no chemicals are transmitted to the plant), coco coir or sheet moss, and clear fishing line or wire.
- Lightly moisten the moss or coco coir and place it in the middle of the wood. This is what the shield fronds will form around to create the base of the plant.
- Take the fern out of its container and brush off any soil. It’s okay if there’s a little left.
- Put the fern’s root ball on top of the moss. Flatten out the root ball a little if necessary.
- Arrange more moss around the root ball to cradle it in place. Be careful not to cover up any of the shield fronds.
- Wrap the fishing line around the dead shield fronds and wood to firmly secure the fern.
- Fasten the fern to the base well so it doesn’t fall over as it grows. Make sure the fastening only goes through the browned shield fronds, never the soft green ones. As the fern grows, it will hide the fastening elements.
Staghorn Fern Care
This section cover important Staghorn Fern care topics such as lighting, watering, fertilizing, temperate, humidity, and more.
Light
Staghorn Ferns like lots of bright, indirect light. In this way, they are different from other ferns which can tolerate shade. Staghorns are tropical understory plants; they want lots of light but never direct sunlight. Direct sun will quickly burn the leaves and dry out the root ball.
The best place for a Staghorn Fern is the brightest spot in your home that isn’t the direct sun. A location near an east or south-facing window is ideal. North-facing windows can work also. Staghorn Ferns do not do well with artificial light; this is not a houseplant for offices without windows.
Water
Improper watering is the fundamental cause of Staghorn Fern death. They like thorough deep waterings, but the roots will rot if the water doesn’t drain well. On the other hand, it is essential not to let the roots dry out. You’ll need to touch the moss at the fern base for dryness regularly.
The best watering technique for Staghorn Ferns is two-part, soaking and misting.
Soaking: Put the root ball in a container of water or the sink. Let it soak for 10-20 minutes until the roots are saturated. You can speed up the process by holding the fern to submerge the root ball. It will take 2-3 minutes for the roots to be fully saturated.
If your staghorn is mounted on a piece of wood, put the plaque under the sink tap, angled so water can run through the root ball. Let the fern drip-dry before re-hanging it.
Misting: Use a spray bottle with a fine mist spray. Mist the entire plant daily. Make sure to get the undersides of the antler fronds.
For most indoor locations, soaking once a week is sufficient. This, of course, depends on the temperature, humidity, and plant location in your home. But, start with once a week and see how your fern does. During the summer, you’ll likely need to increase watering and, in the winter, decrease it.
The fern is being underwatered if you notice the antler fronts wilting or turning brown at the tips. Antler fronds browning or blackening at the base is a sign of overwatering.
If your Staghorn Fern is mounted near a fireplace or heating vent, it will dry out much quicker in winter. The key to keeping the staghorn thriving is to constantly monitor the moisture, checking at least once a week.
Temperature & Humidity
Staghorn Ferns are remarkably cold-hardy for tropical plants. Their ideal temperature is between 50-95F. They like lots of humidity but will do okay with less humidity as long as they get enough water. Staghorns absorb water through their fronds and roots, so high humidity allows the plant to receive moisture quickly.
Many people keep their staghorns in the bathroom because of the high humidity.
Soil & Potting
Staghorn ferns do not grow to maturity in soil. However, they can grow in a pot while they are young. If you have it in a container, use moss or orchid bark. This is not the best solution, though, and for them to thrive, they should be mounted. The roots need something to attach to that will still give them access to good airflow to gather nutrients.
Fertilizer
During the growing season, spring through summer, add a diluted fertilizer once a month to young plants. Don’t add any fertilizer during the winter when the fern is resting. Mature staghorns only need fertilizer twice a year.
Pruning
Withered antler fronds can be pruned as they die off. Always cut them off at the base and not in the middle of the frond. Never cut off the tips with the fuzzy brown pores. The shield fronds should never be pruned – they provide a valuable support structure and nutrient source for the fern. They will fall off naturally.
Repotting/Remounting
As the fern grows, you’ll need to move it to a larger pot or mounting board.
Toxicity
Staghorn Ferns are not toxic to people or animals.
Staghorn Fern Propagation
Division is the easiest way to propagate the Staghorn Fern. Small pups, or offshoots, form from a mature mother plant. These offshoots will be underneath the dry shield fronds, so you’ll have to look for them. A staghorn is actually a collection of many offsets crowded together, with new ones emerging as it matures.
The offshoots are easily removed with a sharp knife and then mounted or planted. The cutting should include some roots and leaves.
The staghorn can also be divided by physically cutting a portion of it off. Use sterilized scissors to cut a vertical piece that includes both types of fronds and some roots. This is a bit intense for the plant, but it should be fine as long as the mother plant is strong.
The newly propagated pup or division may take a while to start growing. Don’t worry; this is normal. They can be slow to get going.
Staghorn Ferns can be propagated through spores, but this is complicated, takes a long time, and isn’t often successful. Spore propagation is an advanced method, generally not advised for the home grower.
Common Pests and Diseases of Staghorn Ferns
Thankfully, Staghorn Ferns don’t suffer from many pests or diseases. Like any houseplant, they can get scale or mealybugs, but it isn’t common.
Root Rot
This disease caused by overwatering is a common problem with Staghorn Ferns. The signs of root rot include dull and yellow leaves and slow, stalled growth. Root rot is caused when roots become waterlogged; they lose access to oxygen and end up drowning. Rotted roots are black and mushy. If you notice your plant struggling or failing to thrive, investigate the roots for signs of rot.
Root rot can be deterred if caught soon enough. Cut off all parts of the root ball that are mushy and black. This is a delicate operation, and you must be sure you get it all. If you miss any, it will continue infecting the plant. Wash the roots well after you cut them. Treat them with a fungicide and then put the plant back in its home.
Mealybugs, Scale, Aphids, Spider Mites, Whiteflies
All of these bugs seek out warm, moist environments and love eating greenery. They form masses or colonies on the leaves and stems. Usually, they hang out on the leaf undersides.
These insects are problematic because they feed on plants. This makes the plant weak and susceptible to a secondary infection and infestation. Thankfully, most are easily removed with soap and warm water. Or, you can dip a cotton ball in rubbing alcohol and wipe them off. If the infestation is particularly bad, treat the plant with an insecticidal soap or neem oil solution.
To make a neem oil solution, mix two teaspoons of neem oil with one teaspoon dish soap in a quart spray bottle. Fill the rest with water and shake well. Spray the plant well, making sure to get the leaf undersides and root ball too. Repeat this process every 5-7 days until the problem is gone.
Since Staghorn Ferns create brown spores on the leaf tips, they can be mistaken for a bug or fungal problem. If you look close, though, you can see they are spores and not insects or mold.
Staghorn Fern Common Questions
Here are a few of the most common questions that we get about Staghorn Fern care:
Should I feed my Staghorn Fern with a banana or tea grounds?
Some growers suggest feeding the Staghorn Fern by putting a piece of a banana peel or used tea grounds under the shield fronds. It isn’t confirmed, but you can try it and see – it won’t harm the plant.
What is this white dust on the leaves of my Staghorn Fern?
The white dust on Staghorn Fern leaves is actually very fine hair. It protects the plant by retaining moisture. Don’t wipe it off; it is normal and helps the plant. However, don’t worry if you’ve already wiped it off once or twice. It will come back.
How long will my Staghorn Fern live?
A well-cared for plant will thrive for decades.
Staghorn Ferns add an artistic element to your home. The mature plant gets a lot of attention mounted on the wall as a plaque. It does take some patience and consistent attention to keep a Staghorn Fern thriving, but the result is worth it.
