
Philodendrons are known to be relatively easy plants to care for, especially in spaces with bright, natural light. They’re also somewhat adaptive and versatile, so they can live through moderate temperature fluctuations and a little drought here and there. Though philodendrons can be forgiving, they can be hard to read.
Since they can stand up to a little neglect, philodendrons are notoriously good at hiding their symptoms. One of the most overlooked aspects of philodendron care is re-potting, as they tend to grow rather quickly and need re-potting frequently enough to allow for a healthy root structure.
Philodendrons are typically happiest in warm, tropical rainforests; the type with multiple levels and a canopy. They do best if they’re given something to climb or trail on, including moss poles and trellises, which closely mimic their natural ability to attach to and climb trees in order to reach the sunlight and therefore photosynthesize.
While it’s great to focus on providing the right parameters to the aerial roots of the plant, which allow it to climb, the terrestrial roots (the ones under the soil at the base) need quite a bit of upkeep and will quickly become unmanageable if left in broken down soil too long. That’s why it’s important to check the roots and repot your philodendrons before it becomes a rescue attempt!
The Best Way to Re-Pot a Philodendron
In a perfect world, you can choose between potting philodendrons in either soil, dense orchid mix, or leca (expanded clay pebbles). But that’s just not the case in every climate; leca dries out quickly in dry environments, and soil can hang onto moisture too long for very humid ones. Make the best choice based on the humidity you have in your space.
We like to use a mixture of half orchid soil or bark and half potting mix, with a little bit of charcoal and perlite mixed in for good measure. It’s not only a good way to ensure that there’s proper aeration, but the chunky soil also helps prevent fungus gnats from building huge colonies in your philodendron pots.
Speaking of soil, you’ll also want to find the perfect pot for your philodendron. Most philodendrons don’t like to be dry, so it’s best to stick with pots that aren’t porous- plastic or glazed ceramic works best. You can also pot in an orchid pot or grower’s pot and place that pot into a larger, decorative planter to help with drainage and humidity.
For our demonstration, we’ll be using soil, which is more common for most plant beginners out there. Here’s our step-by-step guide to re-potting philodendrons.
Supplies
- Chunky soil or leca (expanded clay pellets)
- Hydrogen peroxide
- Plant shears or sharp razor blade, sanitized
- Slightly larger pot (or multiple smaller pots)
- Potting tray or bin
- Skewer, pencil, or another pointy object
- Fresh water and drip tray
Step 1: Unpot your philodendron
Before you go dumping your plant out of its pot, give it a quick watering to help loosen and soften the roots. This will help to prevent breakage that can happen while re-potting, especially if a plant is particularly rootbound.
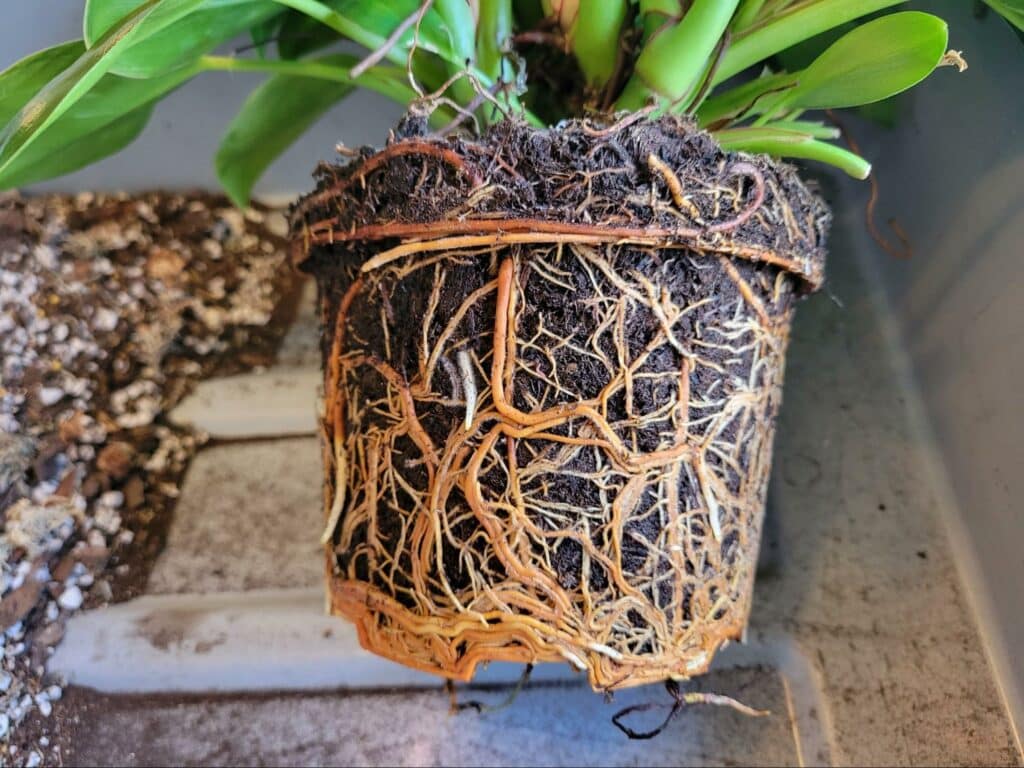
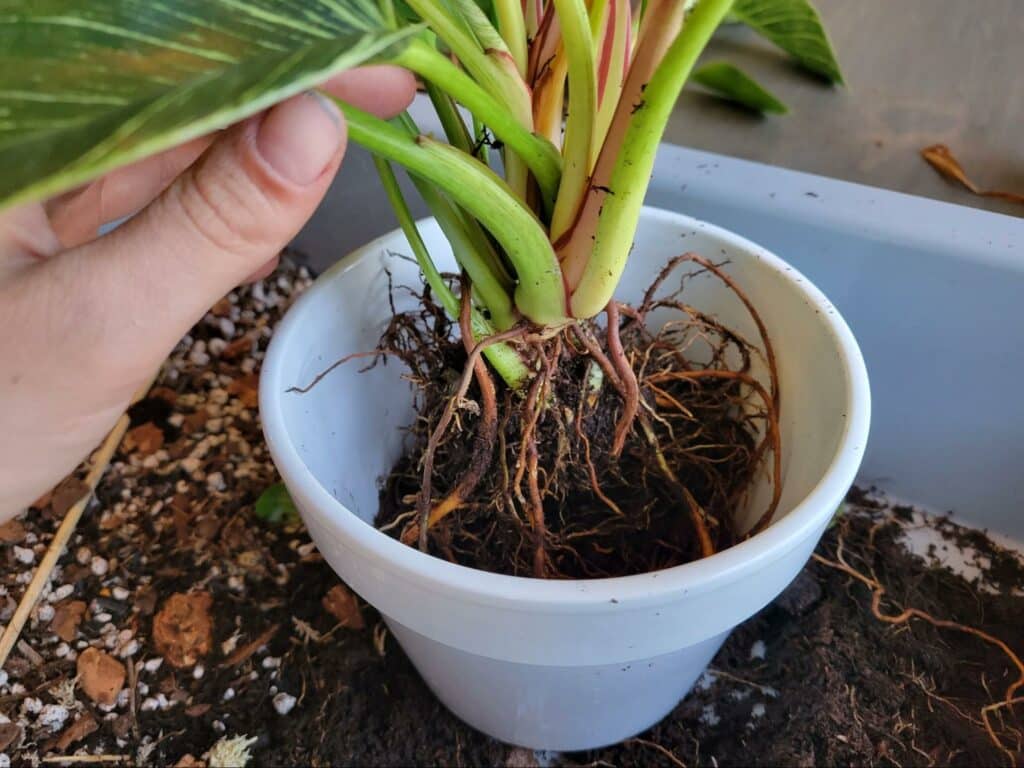
As you remove your philodendron from its pot, check the roots to see if there’s any damage. Severely rootbound plants, like the one we’re re-potting, will need some extra love and attention before they’re planted in their new pots.
Step 2: Loosen the roots
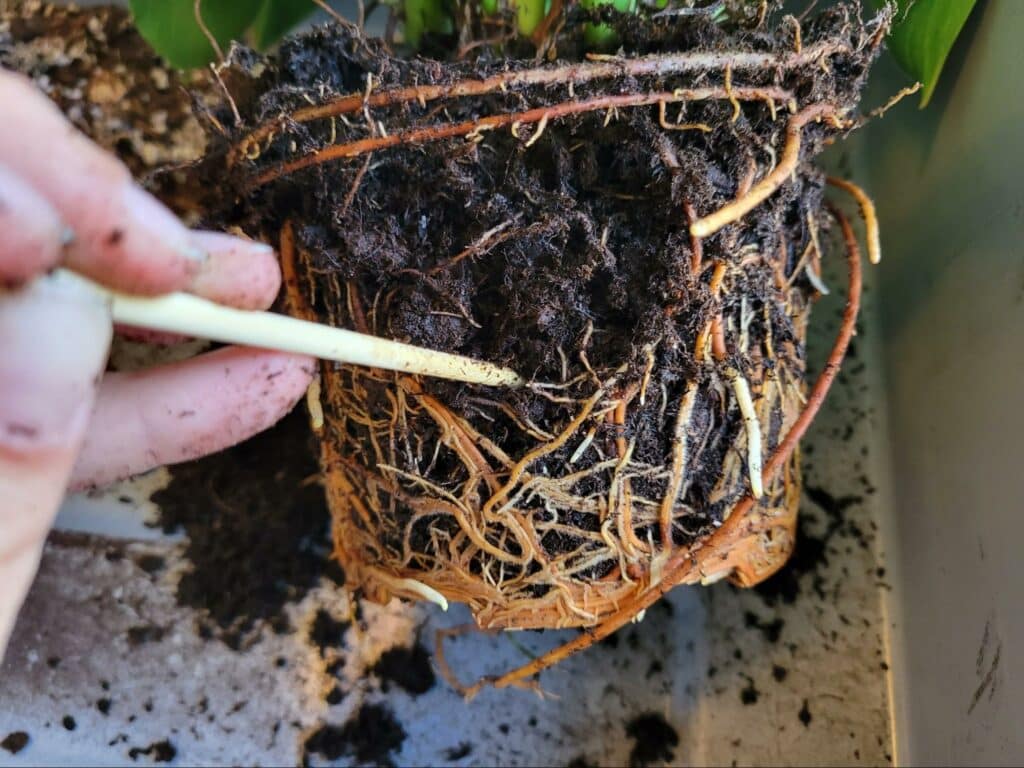
Adding water from a spray bottle or a bowl as needed, gently begin to loosen any bound roots to ensure healthy root growth and prevent root rot and pests like fungus gnats. This particular plant has overgrown its pot by far, leaving it severely rootbound and prone to root rot.
To ensure that your philodendron doesn’t have root rot, give it a sniff. We know, it sounds weird, but if it has that signature rotten smell, it needs extra help. Remove any squishy, dark-colored roots and spray the remaining roots with a hydrogen peroxide mixture to kill off any additional rot after a thorough rinse.
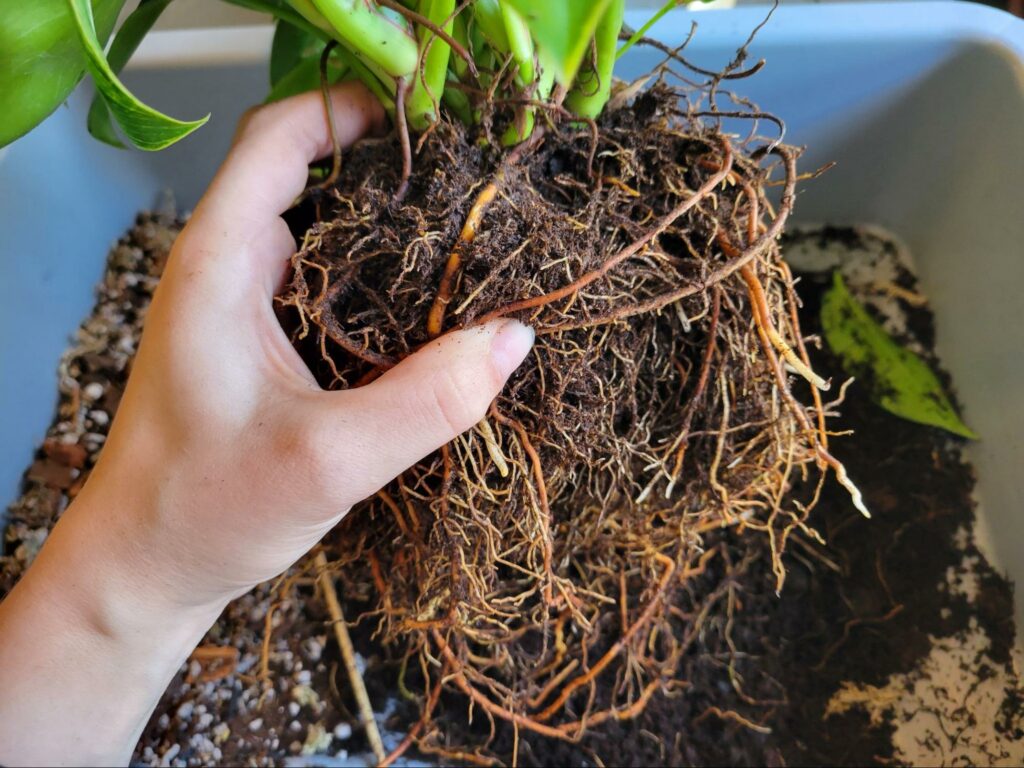
Step 3: Divide (optional)
Philodendrons that are bushy or commonly grow new shoots from the soil, such as philodendron birkin, may need to be divided if they’re not being planted into a larger pot. Re-potting is also a great time to make cuttings, which can easily be transferred into a water vessel for propagation.
If you have several stems in one pot, you can easily divide them either by gently pulling them apart (don’t tear them apart- make sure you’re not destroying too many roots) or cutting them at the base with a sharp, disinfected blade or plant shears. Each division should have its own healthy root system. If not, try rooting them in water until they’ve grown enough roots to make more potted philodendrons!
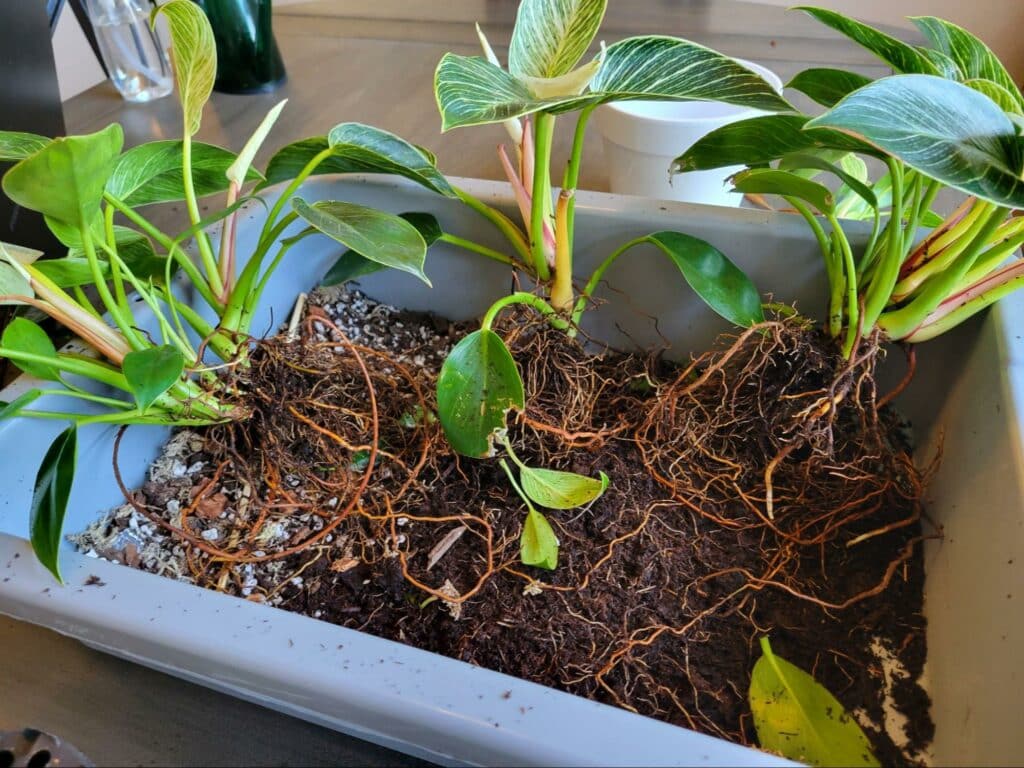
Step 4: Re-potting
To re-pot your philodendron, simply add soil up to about a third of the pot’s depth. This will give the roots a chance to grow not just out, but also down, as they rebuild. Then, carefully place and arrange the plant(s) in the pot the way you’d like them, so that the roots will sit just under the soil line and any stems will sit just above.
Then, backfill the pot with soil to cover the areas around the roots in soil. Be sure to periodically tap the pot down gently on a hard surface to encourage soil to fall between fine roots. This will help to remove air bubbles in the new soil, which can lead to root rot. Be sure to carefully tamp down the soil once the pot is properly backfilled before watering.
Step 5: Watering
Watering the first time after a re-pot may not go exactly as it normally does. Most soil becomes slightly hydrophobic, or water-repelling, as it sits over time and loses moisture; for this reason, the best way to water a freshly re-potted philodendron is to top and bottom water. We like to place the pot in a large bowl, water the top, and allow the water to pool at the bottom of the bowl.
Go ahead and let this sit for an hour or two, while the soil slowly begins to take in and hold water. After the soil is visibly soaked and the pot is heavy enough to convince you that the soil is indeed good and wet, remove the pot from the bowl and allow it to drain fully into a sink or towel.
Philodendron Care After a Re-Pot
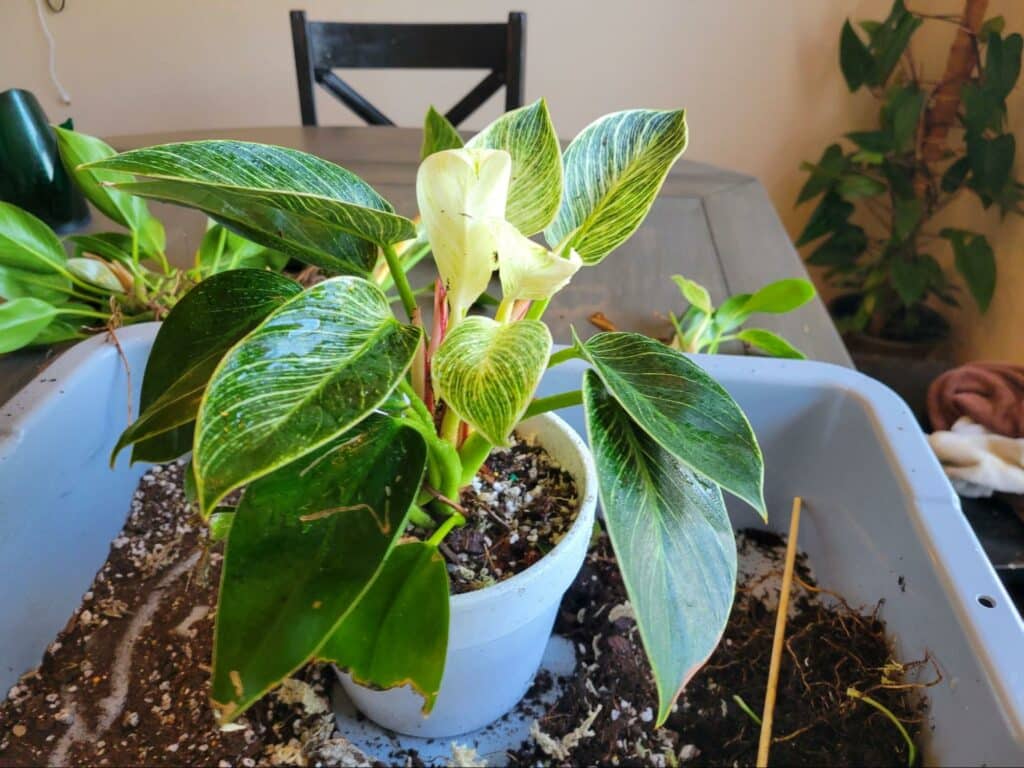
Some of the less hardy types of philodendrons (namely the fancy, variegated ones you pay money for) may need a little extra TLC after they’re re-potted. Watch out for drooping or discolored leaves, which can be a sign of stress or root problems after a re-pot.
While it is normal for philodendrons to lose a leaf or two after a jarring experience like re-potting, excessive leaf loss is not so normal. In fact, the plant’s roots may be too damaged to support many leaves; in this case, consider trimming back to the last healthy leaf and taking a cutting at this point.
In general, though, philodendrons should have consistently moist, but not soaked, soil for the first few weeks after they’re re-potted. This will provide an opportunity for new roots to easily push through the soil and will provide the plant with enough water to continue to put out new leaves.
It’s also a good idea to avoid placing newly re-potted philodendrons in extremely bright or direct light; they’re already weak from the stress of a new pot and soil, so they’ll be quicker to burn in the light. Place them in moderate, indirect light for a few days before slowly gravitating toward bright, indirect light.
Philodendrons are generally forgiving plants, which makes them perfect for beginner indoor plant enthusiasts. If this is your first time re-potting one, don’t worry; these issues don’t often occur if you’ve followed our step-by-step guide. Enjoy watching your philodendron grow!

Thank you for this clear and thorough article. It is the only article I could find that discussed dividing a heart philodendron and the photo showed exactly what I wanted to know. All kinds of article about propagating online but seriously few about dividing. Thanks again!